Is it still spring? It’s been such a busy start to the season that we suddenly seem to be in summer already. Thank you to everyone who has come on courses already; just as it starts to calm down we move into show season.
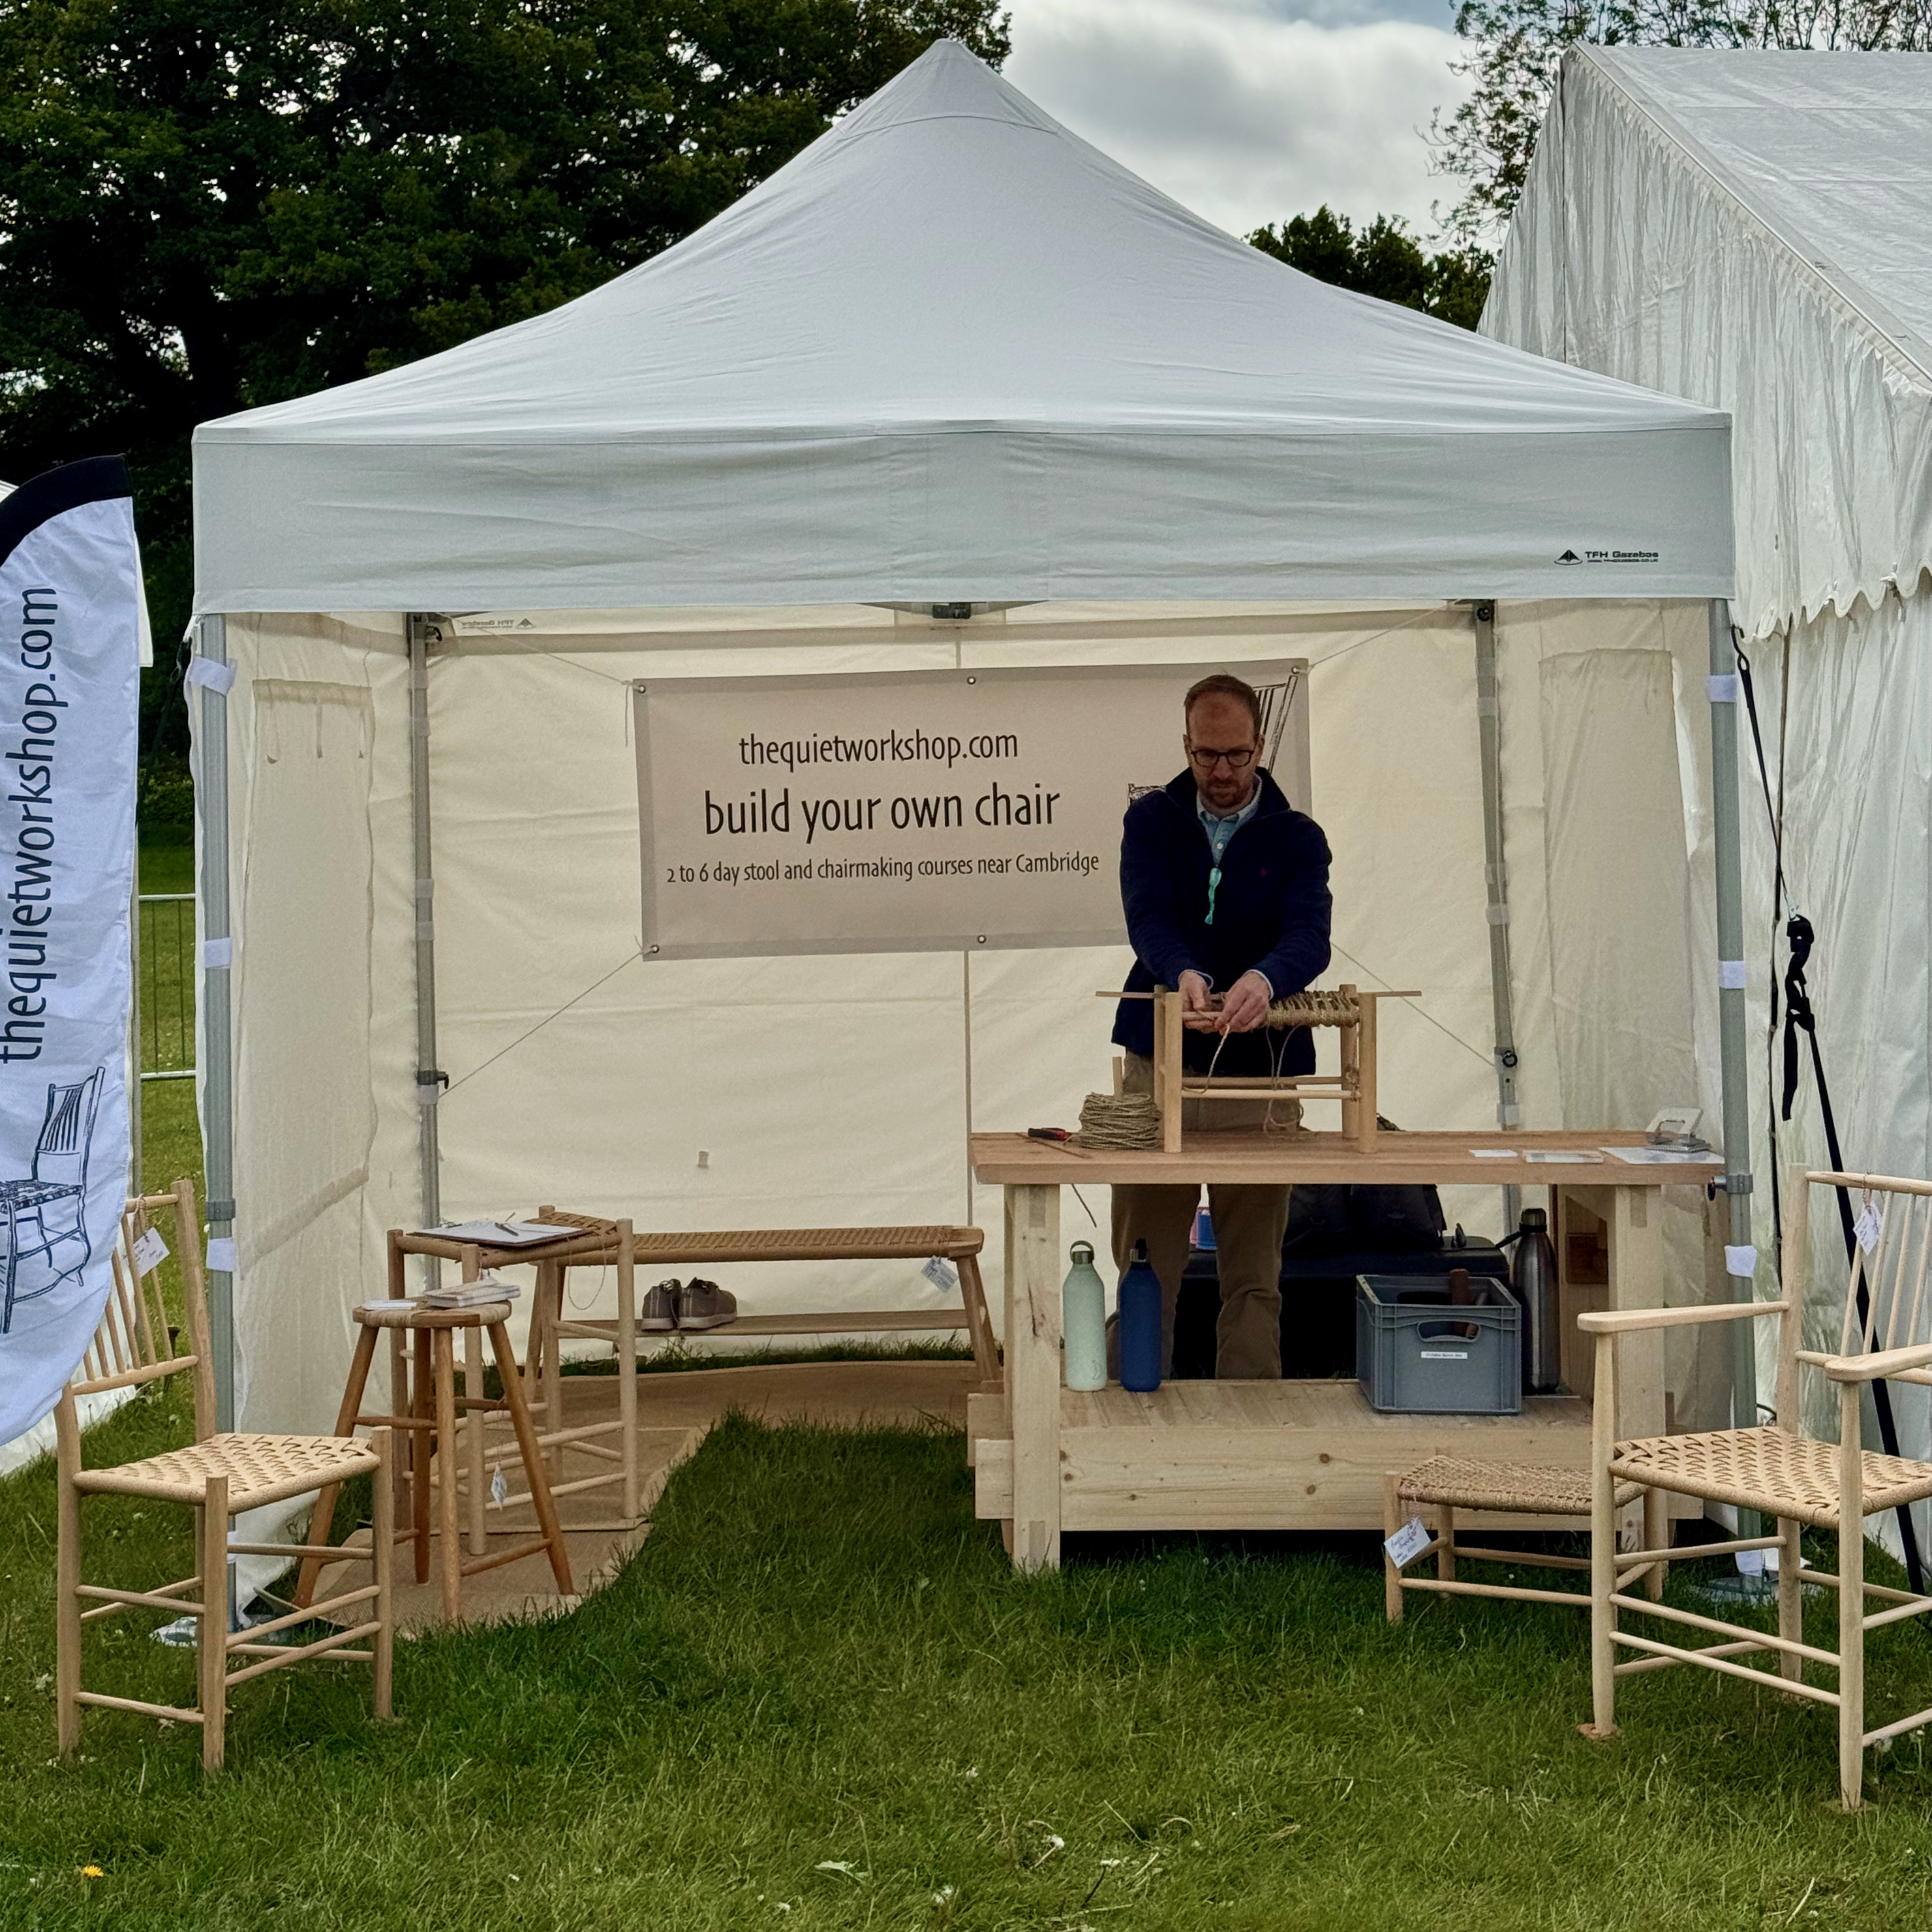
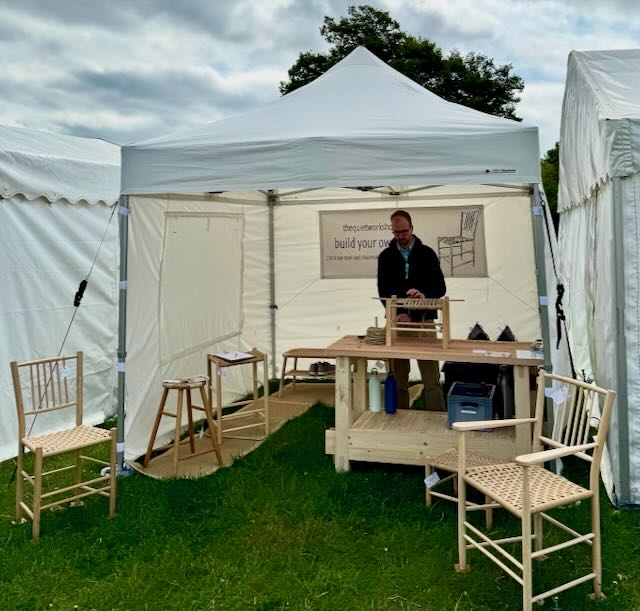
We’ve been invited back to the Festival of Upholstery and St.Alban’s Upholstery School to teach expanded workshops at both: at the festival we’ll be teaching a three day weaving course which will cover our standard square weave, L nail weaving and the envelope weave. Participants will be putting together a stool from a kit and will take home their final project. We’re really looking forward to it; we had a great time there last year.
We’ll be teaching another Danish cord workshop at St.Albans in September and then a dedicated envelope weave course in January. At these workshops you bring your own chair to weave so start looking out for one now!
Our vice screw kits have had a good reception and we’re almost out but we’ll be restocking over the summer.
Course Dates 2026
The dates for all of our courses for the rest of 2026 are available on our website. They link through to Craft Courses for booking.
So that we don’t disappoint anyone we always run courses that have bookings; on the rare occasions that just one person books on a particular date then that course will run. Whilst this makes no financial sense whatsoever we feel that if people make plans in advance they should be confident that they’re not going to be disappointed.
If you’d like a course for a small group and our dates don’t suit you please get in touch. If we haven’t had a booking at a time that does suit you we’re always happy to move things around.
Shows – 2026
Our show season started with a lovely four day exhibition at Hatfield House for Living Crafts. It was great to meet so many people who are interested in traditional crafts.
If you think there’s a craft show within an hour’s drive of Cambridge that we should attend please drop us a line. We’re always grateful for new opportunities.
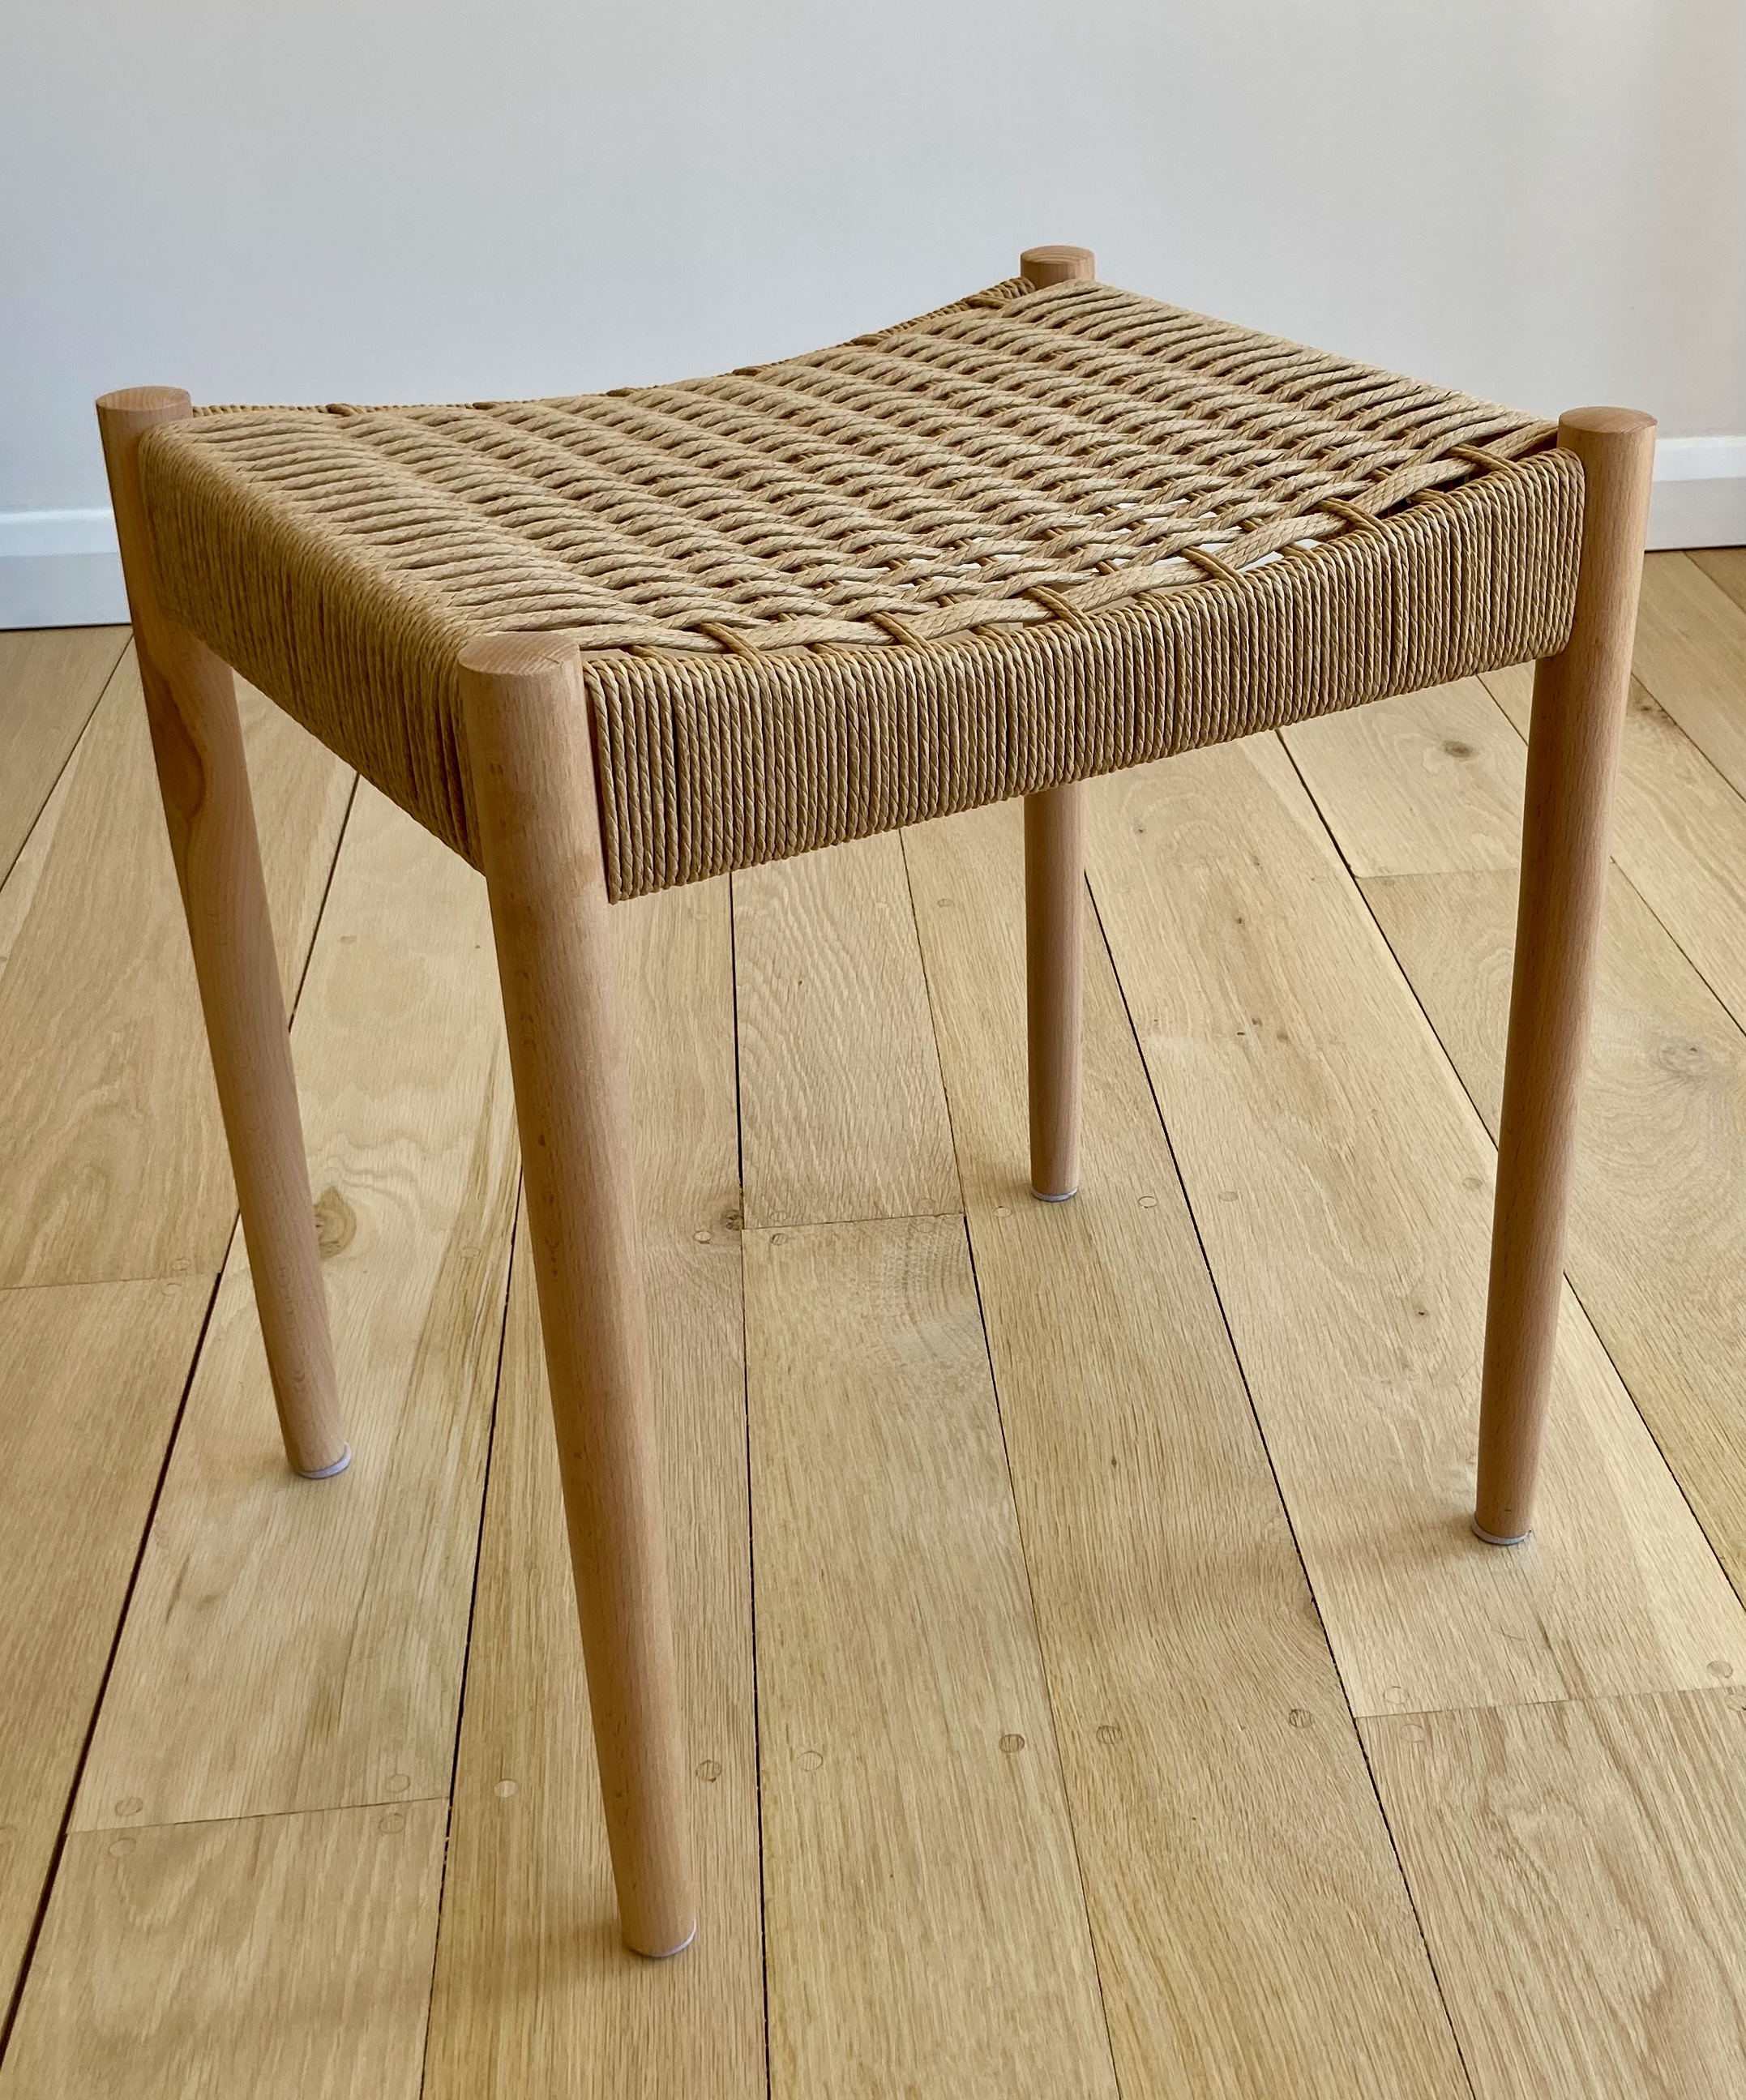
Danish Modern kit
If you want to learn L nail weaving or just want to build an elegant and comfortable stool at home we’re launching a new kit.
The kit will contain all the materials needed. You just provide a few basic tools and a couple of clamps. We’re working on a video to talk you through putting the stool together and weaving the seat. When it’s ready we’ll make it available in our shop.
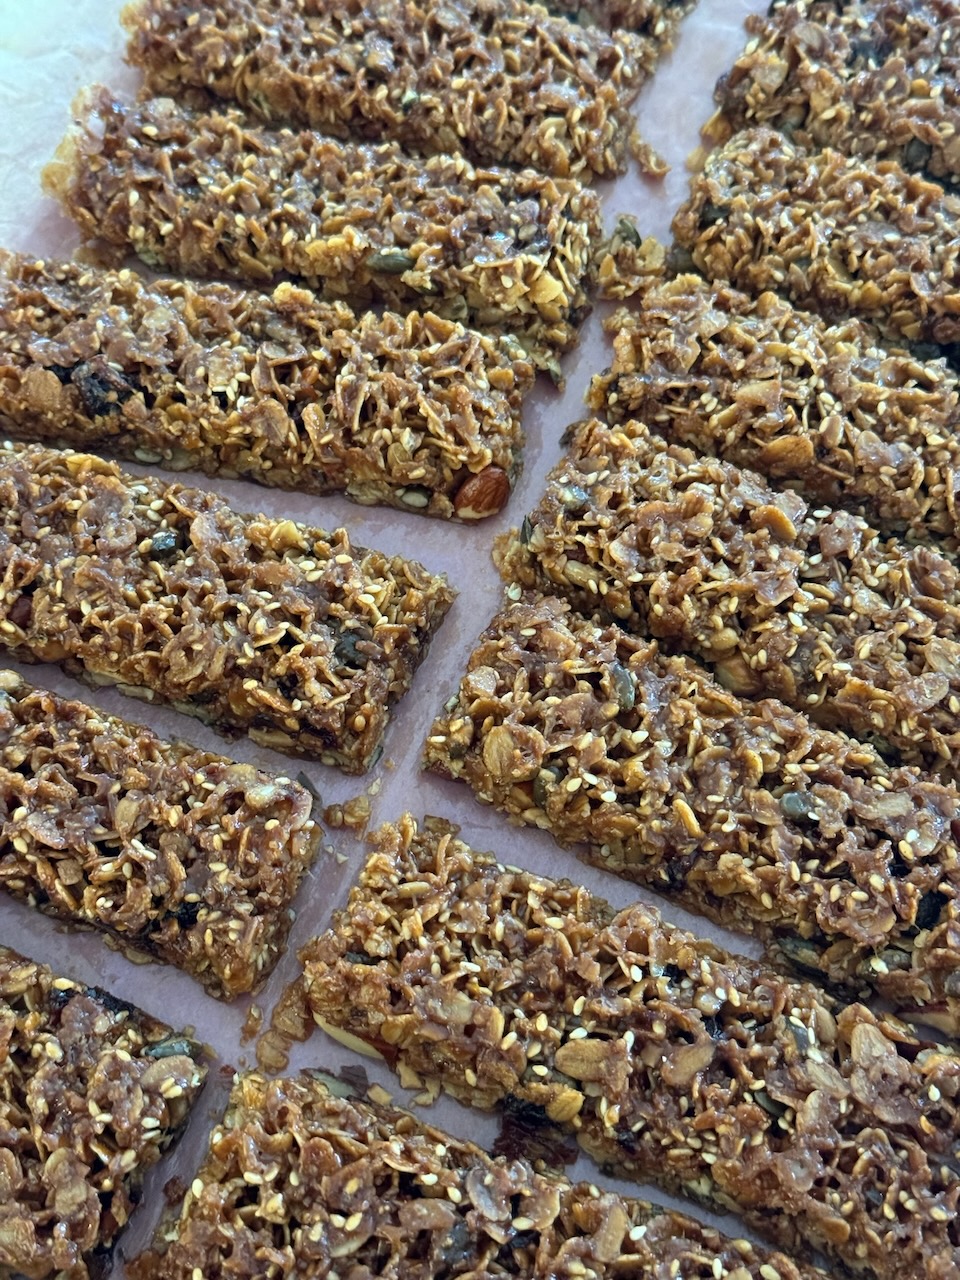
Fresh Bakes
Lunch and refreshments are included on all our courses. Three times a day we down tools and decamp to the conservatory to eat Bryony’s lovely bakes and talk about chairs (and anything else). We think these breaks are really important to give you an opportunity to go back to the workshop well-fed and refreshed, ready for more chair-making!
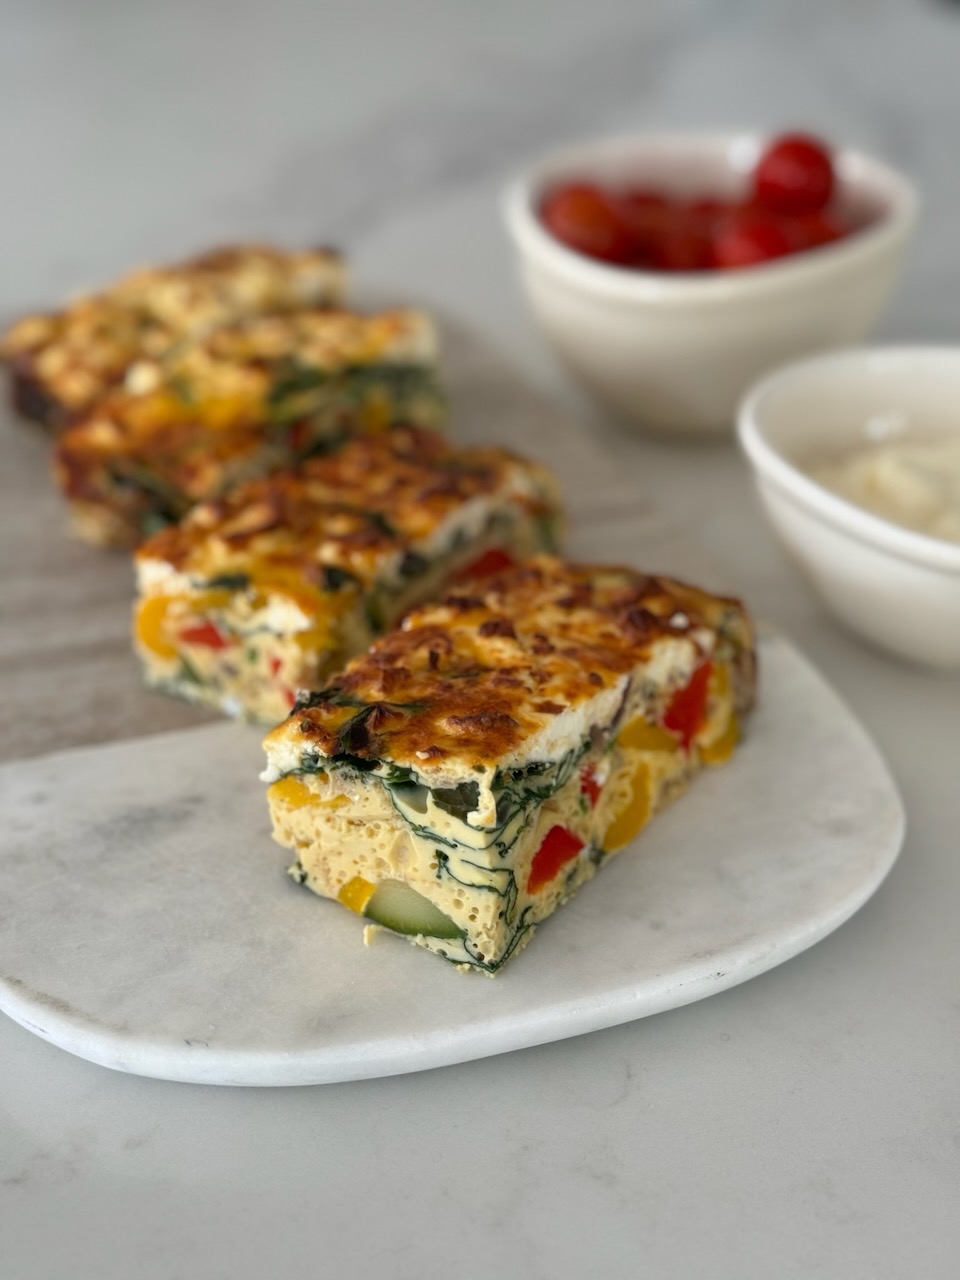
Freshly baked Shoo Fly Buns – a new course favourite
Open Studios – steam bending demonstrations
We’re opening the workshops to the public every weekend in July as part of Cambridge Open Studios.
We often get asked at shows how we bend timber for the backs of our chairs so we’re going to do a steam bending demonstration at 12 noon on the 18th July. If it’s not raining this will be outdoors.
As always, if you’re interested in coming on a course and you want to find out more please give us a ring (07778 397328) or drop us an email. You can book all of our courses through the links on our website. If our dates aren’t perfect for you or you want to book for a group give us a call; we can usually work something out. Don’t forget course fees include all materials, lunch and refreshments each day.
We’ve had a lovely year of courses and shows, meeting new people and sending them home happy, well-fed and with a chair they’re proud of.
It’s been busy with new opportunities: we’ve taught Danish cord weaving at the Festival of Upholstery, a seat weaving class at the St.Alban’s Upholstery School and have launched workbench plans in our online shop.
Thank you so much to everyone who has come on a course, at our workshops and elsewhere. Thanks also to those who have supported us through buying products in our new shop.
Our courses start again in March but over the winter we’ve got plenty to keep us occupied: a new chair design that will be offered as a course, production of our hard finishing wax and vice screws and the launch of custom made workbenches, available from our online store. We’ll have more details of all of these in the new year.
Course Dates 2026
We’ve published the dates for our courses for 2026 – they’re all available on our website. They link through to Craft Courses for booking.
So that we don’t disappoint anyone we always run courses that have bookings; if just one person books on a particular date then that course will run. Whilst this makes no financial sense whatsoever we feel that if people make plans in advance they should be confident that they’re not going to be disappointed.
That said, we’ve scheduled over 30 courses for next season and sometimes we cancel courses that don’t have bookings a couple of weeks beforehand if they’re close to another date that’s fully booked.
If you’d like a course for a small group and our dates don’t suit you please get in touch. If we haven’t had a booking at a time that does suit you we’re always happy to move things around.
Shows – 2026
We’ve really enjoyed the shows this year and though they take out weekends during the season we find them a lovely way to meet people who are interested in our craft.
Some of these dates are provisional because not all the shows we attend have confirmed dates yet. We’ll update them on the website if they change.
7-10th May Living Crafts, Hatfield House, Hertfordshire
If you think there’s a craft show within an hour’s drive of Cambridge that we should attend please drop us a line. We’re always grateful for new opportunities.
They’re available in six different sizes: three in metric, three in imperial. But they’re not just a straight conversion. We’ve designed the imperial and metric benches around the materials most commonly available in different regions and have worked out sensible sizes so that you don’t end up with something silly like a bench top that’s six feet six and forty seven sixty-fourths of an inch!
1m/3.5′ – ideal for chairmaking, small and easy to store but rock solid
1.5m/5′ – a good sized joinery bench but every piece is manageable when setting up or moving it around
2m/7′ – a bench big enough for any furniture project but with a top that’s still moveable by a normal human being
These benches have been designed with five principles in mind:
Built from easily available materials with basic woodworking tools
Only very basic joinery skills required
Easy and quick to set up
Every component must be light enough to move easily around your workspace
Rock solid; the fact that it packs down quickly mustn’t make it flimsy in use
The plans include complete cutting lists for all pieces, a suggested tool list and instructions. Eventually there will be YouTube videos. We’ve finished the introductory video and working on the next 4!
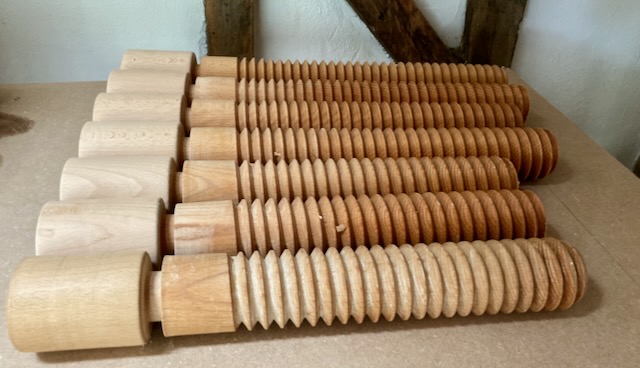
Workbench vice screws
To help you along with your workbench build we’ve started selling the vice screws that we use on our benches. You can use a metal vice attached to the top or you can get a wooden vice screw from us.
St.Alban’s Upholstery School & Studio
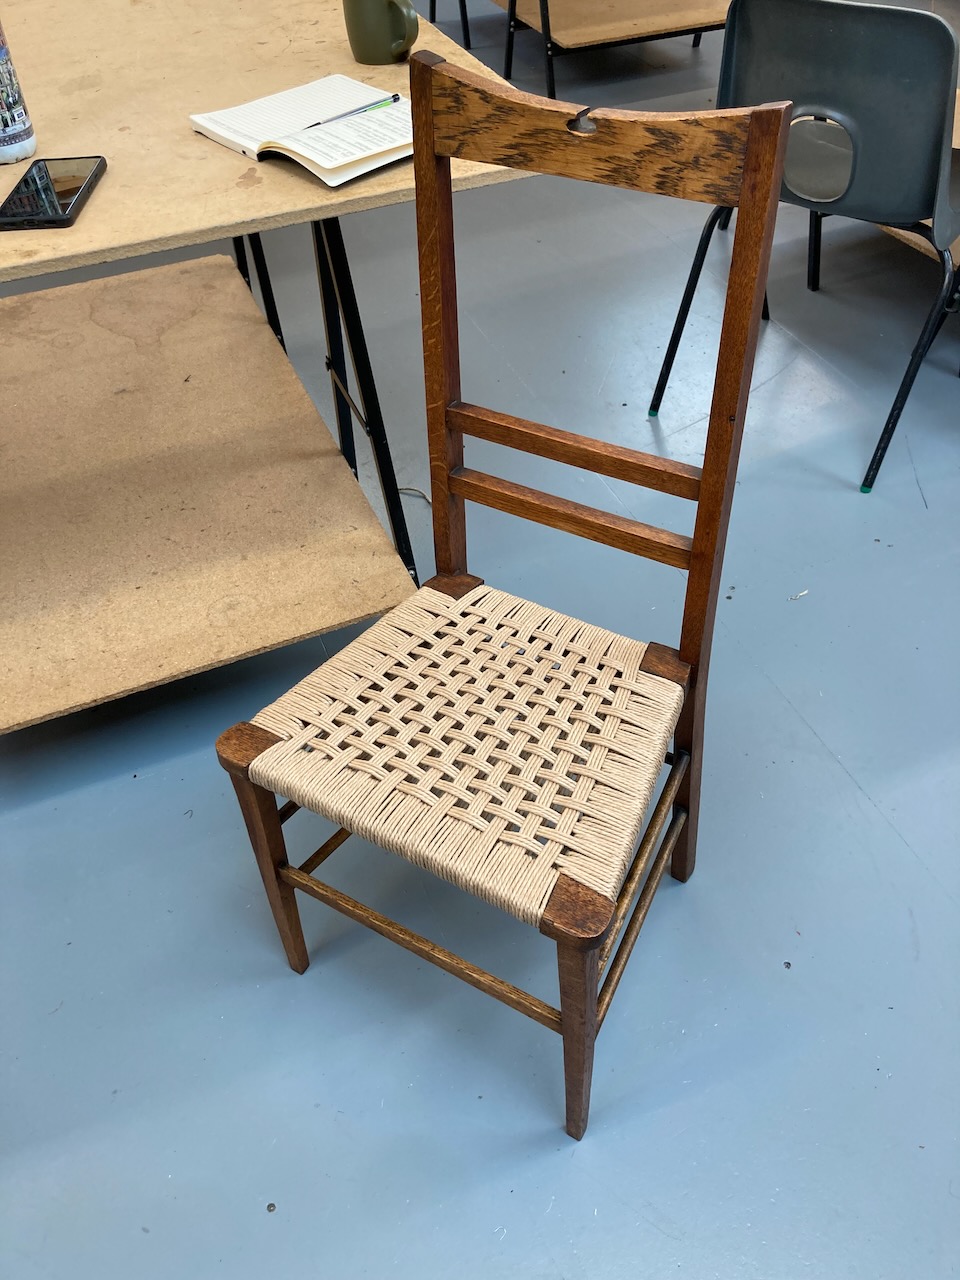
In September we taught a one day workshop in seat weaving with Danish cord and seagrass at the wonderful St.Albans Upholstery School. Participants brought their own chairs that needed a new seat and we worked out a solution for each chair. At the end of the day 8 new seat weavers went home with a completed chair.
It was a really challenging and worthwhile day. Usually we’re teaching people to weave the same seat with only a slight variation in pattern so seeing 8 different designs go home at the end of the day was very satisfying.
Nothing says you’ve done a good job like being invited back and we’re delighted to be delivering another course in January. Keep an eye on their website for details.
If you don’t know St.Alban’s Upholstery School and Studio I hesitate to point you towards their website. 5 minutes of looking at their gallery can prompt either a career change or radical rethink of your interior designs – you have been warned!
A splash of colour
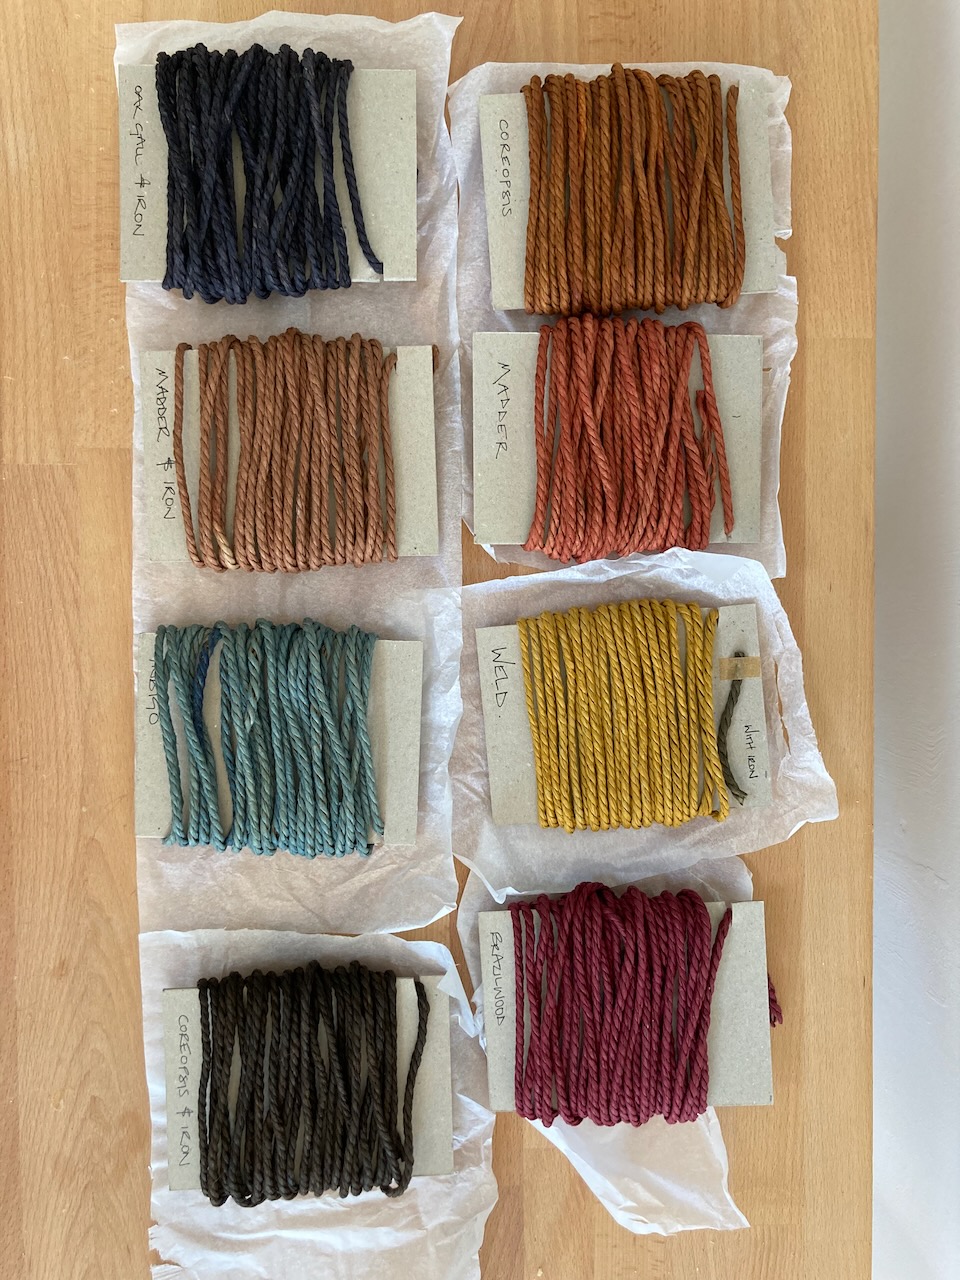
Our amazingly talented friend Jacqui Symons at Slow Lane Studio sent us some dyed Danish cord earlier in the year. We’ve been itching to weave it into a seat and finally found the time and the right chair.
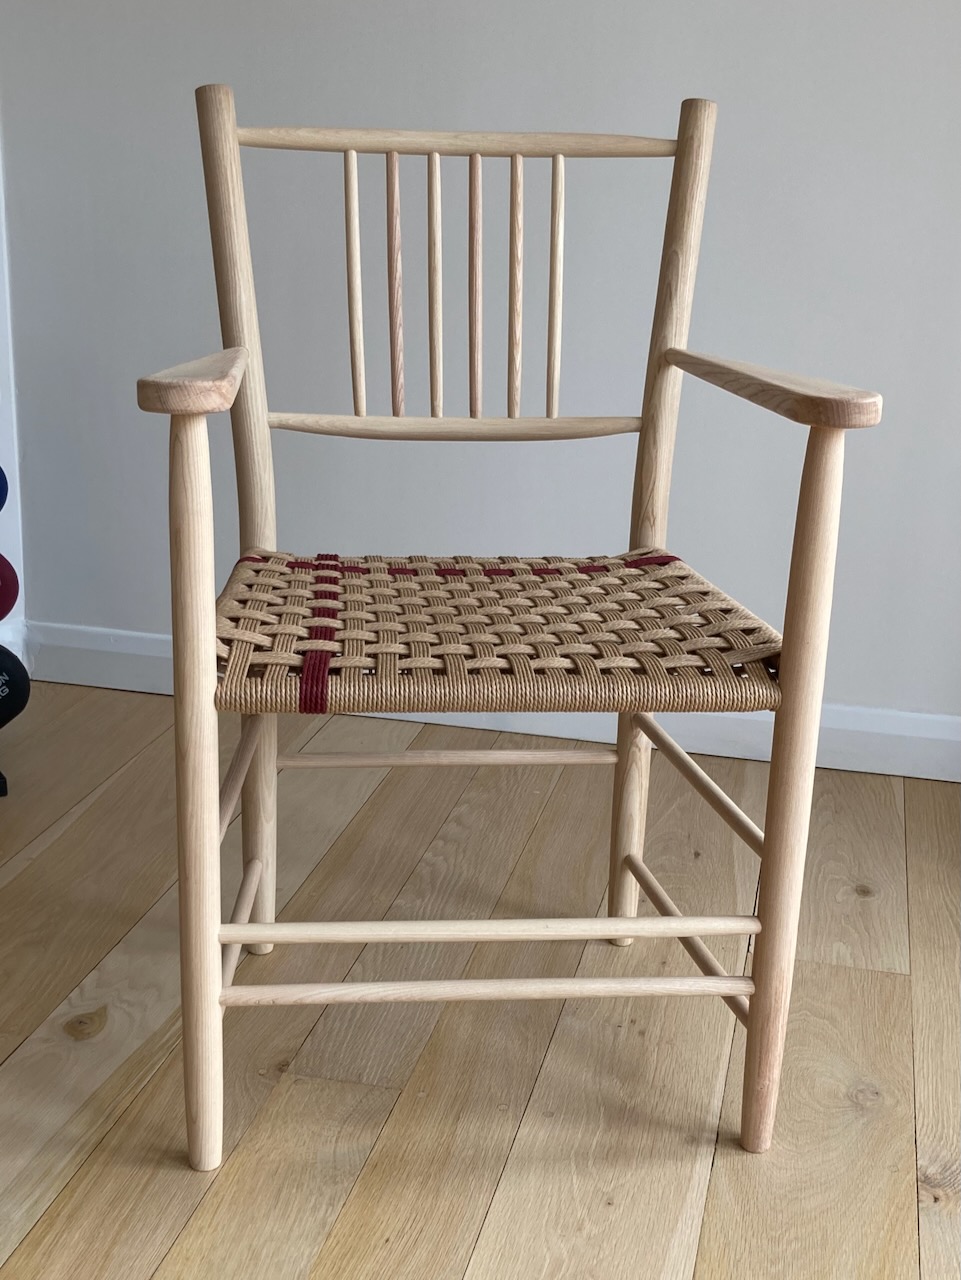
This arm chair uses cord dyed with Brazilwood. The photos don’t really do it justice. It’s an incredibly rich and deep colour and gives the light ash and muted Danish cord chair a new dimension.
We’ve got several more samples to try before we work out what to do next. It’s unlikely that it will feature on a course soon because we need to test it for colour transfer (sitting on it in light coloured trousers!) before we can be sure it’s a complete success. But for the time being we’re delighted!
Jacqui published a book recently on natural dyes and pigments. It’s the culmination of years of testing and researching and is beautifully illustrated. Available direct from her website.
Hard wax
On every course we get asked about finishes: oil or varnish, shellac or wax? We’re always very hesitant to recommend finishes to course participants because we’ve been so unhappy with what’s available. Ideally a finish should be easy to apply, hard-wearing, non-colouring and easy to repair if it gets damaged.
This is called a unicorn finish.
We’ve used lots of different finishes over the years and have had acceptable results from shellac and Osmo Polyx Raw, mixed results from oils and varnishes and disappointing results from waxes.
As a generalisation the longer a finish lasts the harder or more time-consuming it is to apply. Lots of oils and varnishes give too much orange or yellow colour to the wood. Soft waxes are easy to apply but give little long-term protection to the wood.
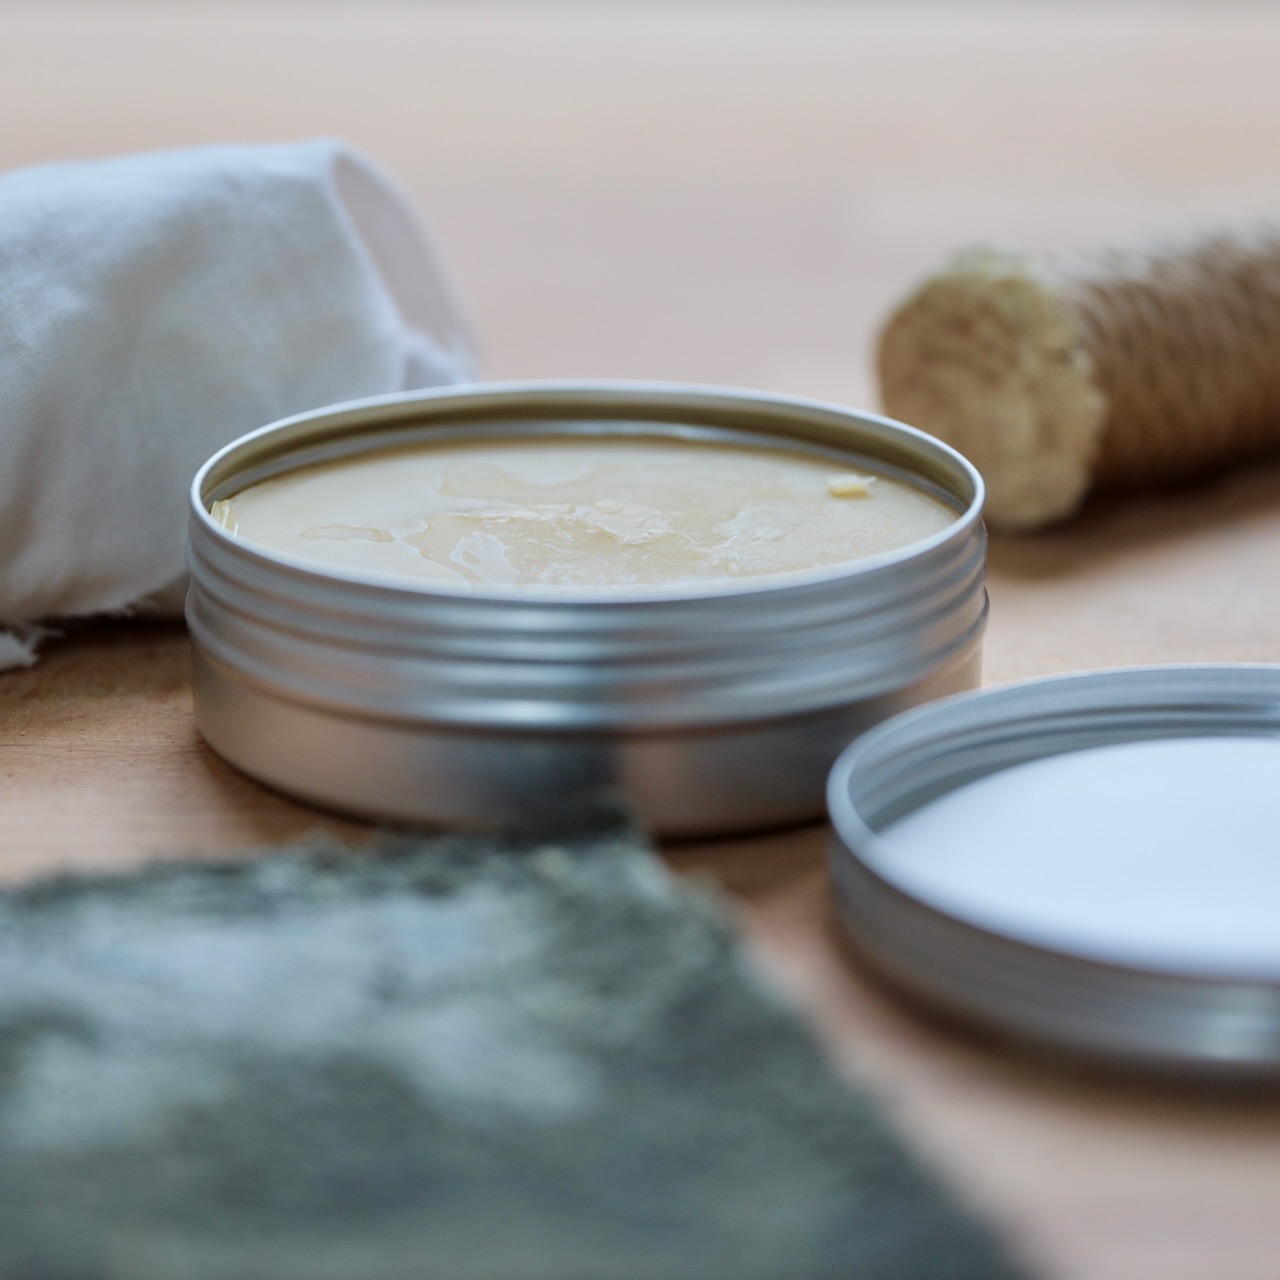
So several years ago we started experimenting with our own wax recipe. Most furniture waxes are soft and contain beeswax or a soft microcrystalline wax. Most use a petroleum based solvent. Most are easy to apply but offer very little longevity or protection.
But there is an alternative. Automotive and marine wax manufacturers use Carnauba wax, a natural, plant-based wax that has a higher melting point than beeswax but is much harder and longer lasting. It’s what professional ‘detailers’ use to make supercars look shiny.
We started experimenting with a blend of Carnauba wax, beeswax and citrus oil to create a wax that is definitely a little bit harder to apply than traditional soft waxes but offers much better protection and longevity.
We’ve been using it on all of our workshop and household furniture for several years and have been tweaking the formula each time. Now we’re happy with the results.
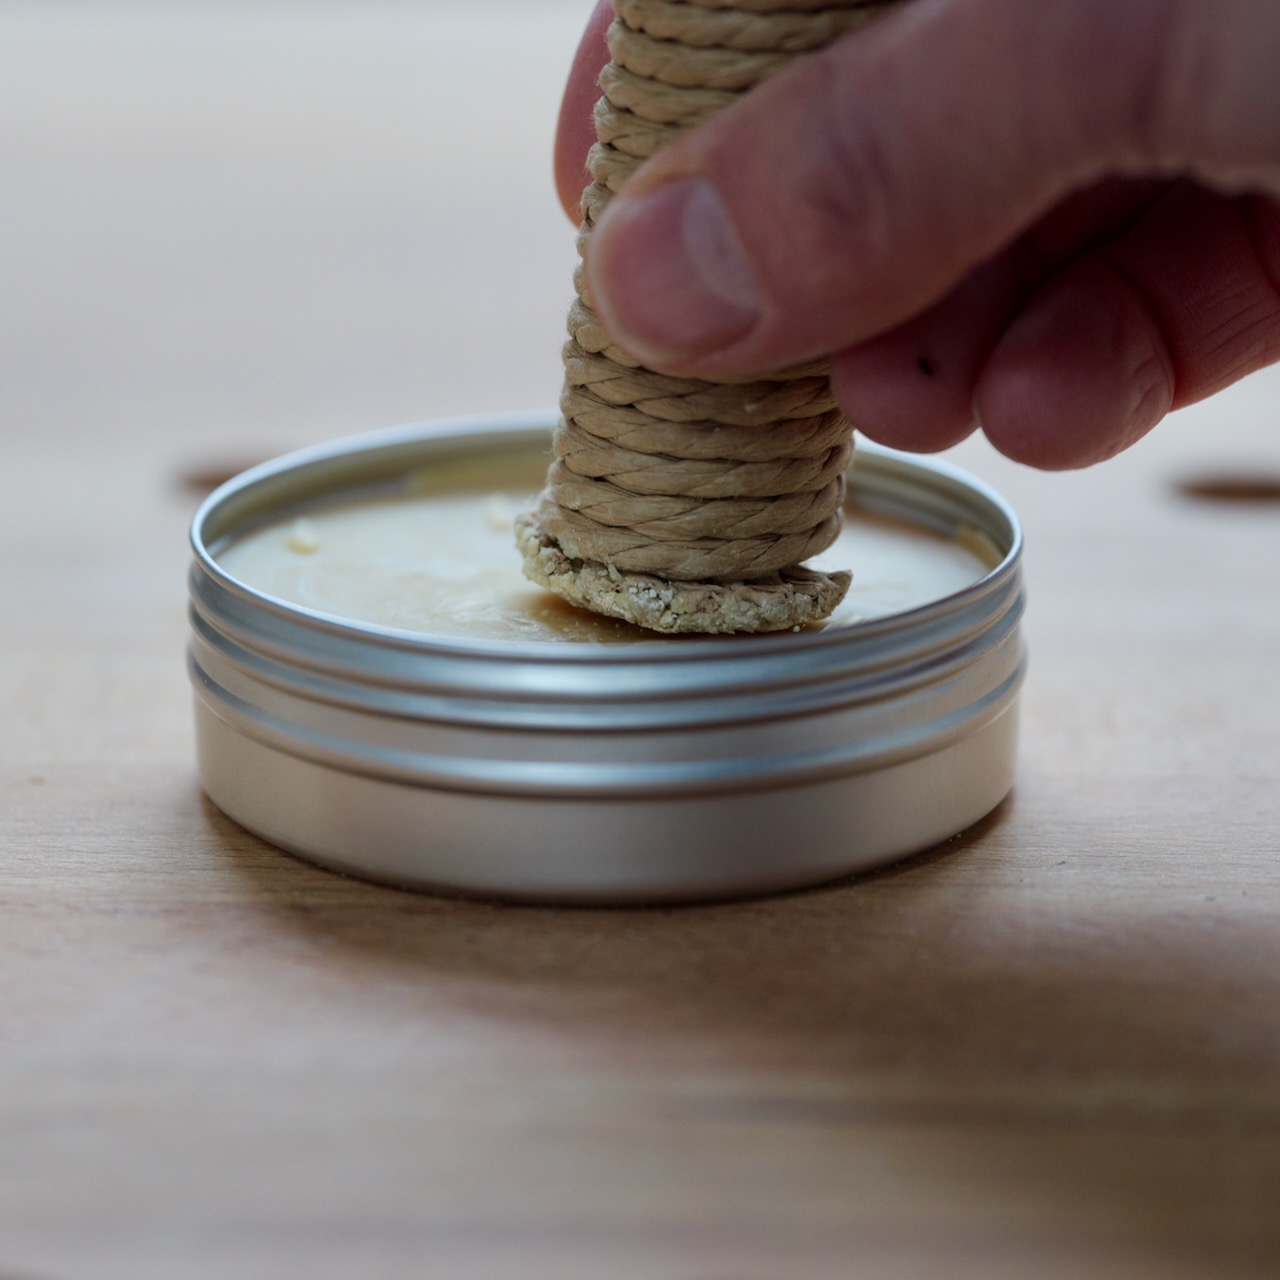
It’s applied with either a burnisher or a grey pad, left for a few minutes and then buffed off.
We use it on its own or over other finishes if required. It gives a soft, subtle sheen and leaves the wood feeling smooth and protected.
The huge advantage of a finish like this is that it can be applied in one coat and the piece of furniture can be handled straight away. You don’t need to leave it to dry overnight and if it starts to wear you can easily top it up without having to sand it back.
We’ve got to work out the packaging details and then we’ll be putting it up on website: look for it in the new year.
As always, if you’re interested in coming on a course and you want to find out more please give us a ring (07778 397328) or drop us an email. You can book all of our courses through the links on our website. If our dates aren’t perfect for you or you want to book for a group give us a call; we can usually work something out. Don’t forget course fees include all materials, lunch and refreshments each day.
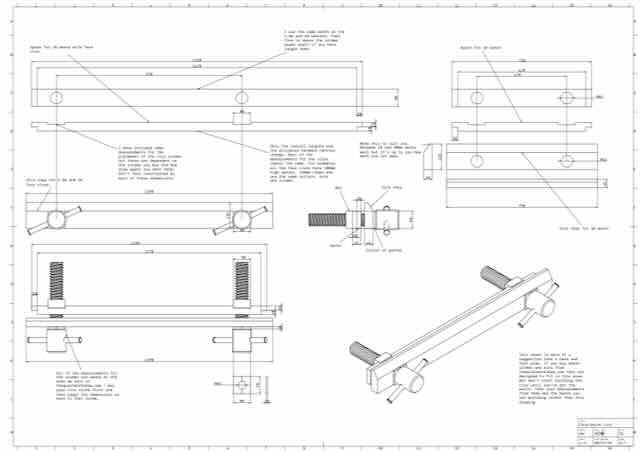
By popular request (no really!) we’re delighted to announce the publication of our workbench plans.
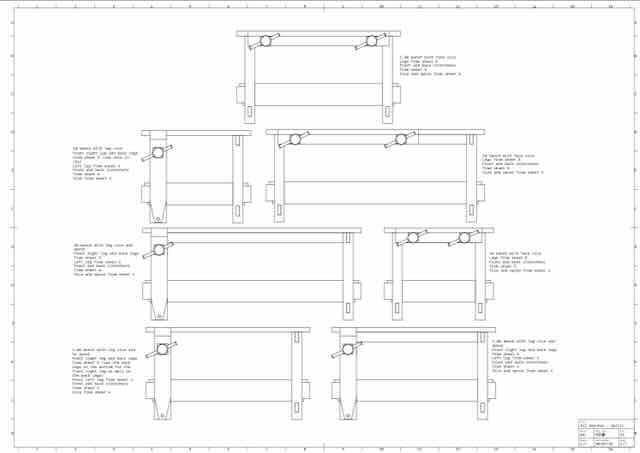
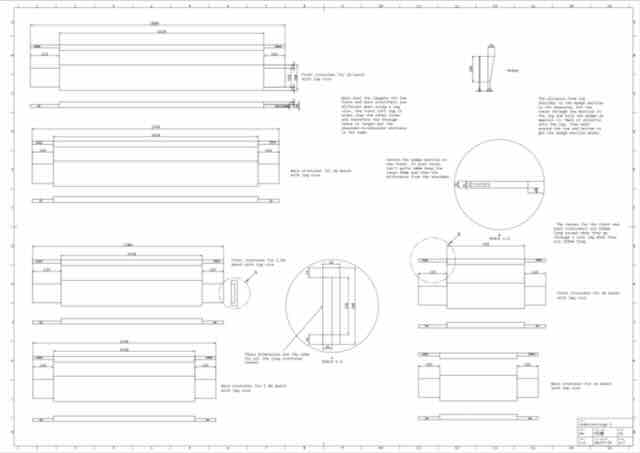
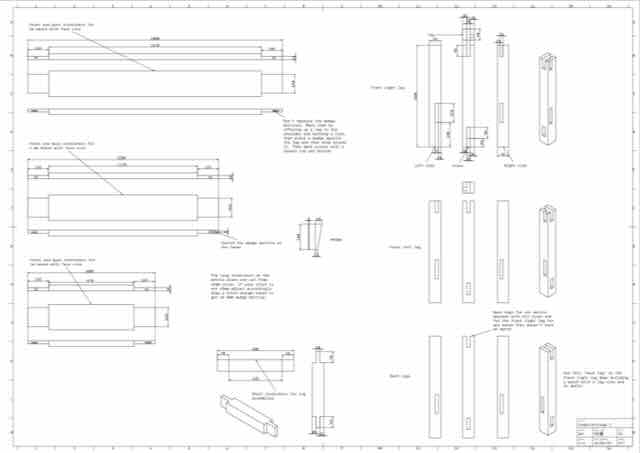
We’ve drawn plans to build our rock solid, take-apart bench in 1m, 1.5m, 2m, 3 1/2′, 5′ and 7′ lengths with a choice of two different vices. You have the choice of metric or imperial measurements. They’re not just conversions of the measurements we usually work in, they’re designed from the ground up in each system. They’re available in our new shop here.
Each set of plans includes 6 A1 drawings, an A4 drawing and 11 pages of instructions. We’re now working on a series of videos for YouTube to support builders with the plans. The plans are currently available for download. Paper plans will be available very soon.
From the introduction to the instructions:
“Our garage used to be a coffin makers’ workshop; in it there is a 10’ bench that is older than any living woodworker. It is built from whatever material didn’t make the grade for coffins and is hammered together with the random selection of nails they had to hand.
Despite the apparent lack of joinery, low grade materials and optimistic approach to bracing it survived life in a busy professional workshop.
Your bench will be better. It will have better joinery, more carefully selected materials and a better design. And you will put more time and thought into building it. So there’s plenty of room for error. When building it live by the phrase “It’s a workbench, not a piano.” When you’ve finished it don’t point out the errors to friends and family and soon you’ll forget where they are. If you get tear-out when you plane it: don’t worry. If you pull out a lump as you drill a through-tenon: never mind. These scars will blend with the clamp marks, the saw cuts and the glue spots that will appear the moment you start using it. Remember: “It’s a workbench, not a piano.”
The design of this bench has been evolving for many years. We run chairmaking workshops and so have built a lot of benches. With each generation they get a little bit better and this is the result.
These benches are designed for woodworkers who have a small amount of space and time to practice their craft. Space that is probably shared with bicycles, a lawn mower and a jet wash. They need a rock solid platform for planing, sawing and chiselling but have to pack it up and share it with the rest of their lives.”
Don’t forget we’re taking part in Cambridge Open Studios this month so if you want to come and have a look round we’re here between 10am and 5pm on the 12th&13th and 26th&27th July.
As always, if you’re interested in coming on a course and you want to find out more please give us a ring (07778 397328) or drop us an email. You can book all of our courses through the links on our website. If our dates aren’t perfect for you or you want to book for a group give us a call; we can usually work something out.
On every course and at every show we are asked about our workbenches. We’ve put a lot of thought and a lot of work into them over more than 10 years. Our most recent bench is at least the eighth iteration of a design that is always almost perfect! Just one more tweak…
So it’s time to stop procrastinating and publish the plans. We’re making these available in six different sizes: three in metric, three in imperial, all in the same set of plans. But they’re not just a straight conversion. We’ve designed the imperial and metric benches around the materials most commonly available in different regions and have worked out sensible sizes so that you don’t end up with something silly like a bench top that’s six feet six and forty seven sixty-fourths of an inch!
1m/3.5′ – ideal for chairmaking, small and easy to store but rock solid
1.5m/5′ – a good sized joinery bench but every piece is manageable when setting up or moving it around
2m/7′ – a bench big enough for any furniture project but with a top that’s still moveable by a normal human being
These benches have been designed with five principles in mind:
Built from easily available materials with basic woodworking tools
Only very basic joinery skills required
Easy and quick to set up
Every component must be light enough to move easily around your workspace
Rock solid; the fact that it packs down quickly mustn’t make it flimsy in use
The plans will include complete cutting lists for all pieces, a suggested tool list and instructions. Eventually there will be YouTube videos but don’t hold your breath…
We’re setting up a shop page on our website: thequietworkshop.com and when that’s live we’ll send a very short newsletter round. Probably the end of June.
If you haven’t been on one of our courses yet but would like to see one in action then come along to…
Cambridge Open Studios
Every July, for the last 51 years, artists and craftspeople in and around Cambridge throw open their doors and invite you into their studios. It’s an incredible celebration of the creativity of the people in the area. 223 studios and 12 larger venues will be open over the four weekends of July. We’ll be taking part on the 1st, 2nd and 4th weekends: 5-6th, 12-13th & 26-27th.
We’re on page 62 of the guide. We’re listed as number 144 under my name: StJohn Starkie. The number has nothing to do with our workshop address which is 41 High Street, Great Wilbraham! We look forward to seeing you in July.
Shows this year
We had a lovely time at Living Crafts Fair at Hatfield House. If you haven’t been before we thoroughly recommend it; we’ll definitely be back next year. If you missed us there you can catch us at one of the following:
If you think there’s a craft show within an hour’s drive of Cambridge that we should attend please drop us a line. We’re always grateful for new opportunities.
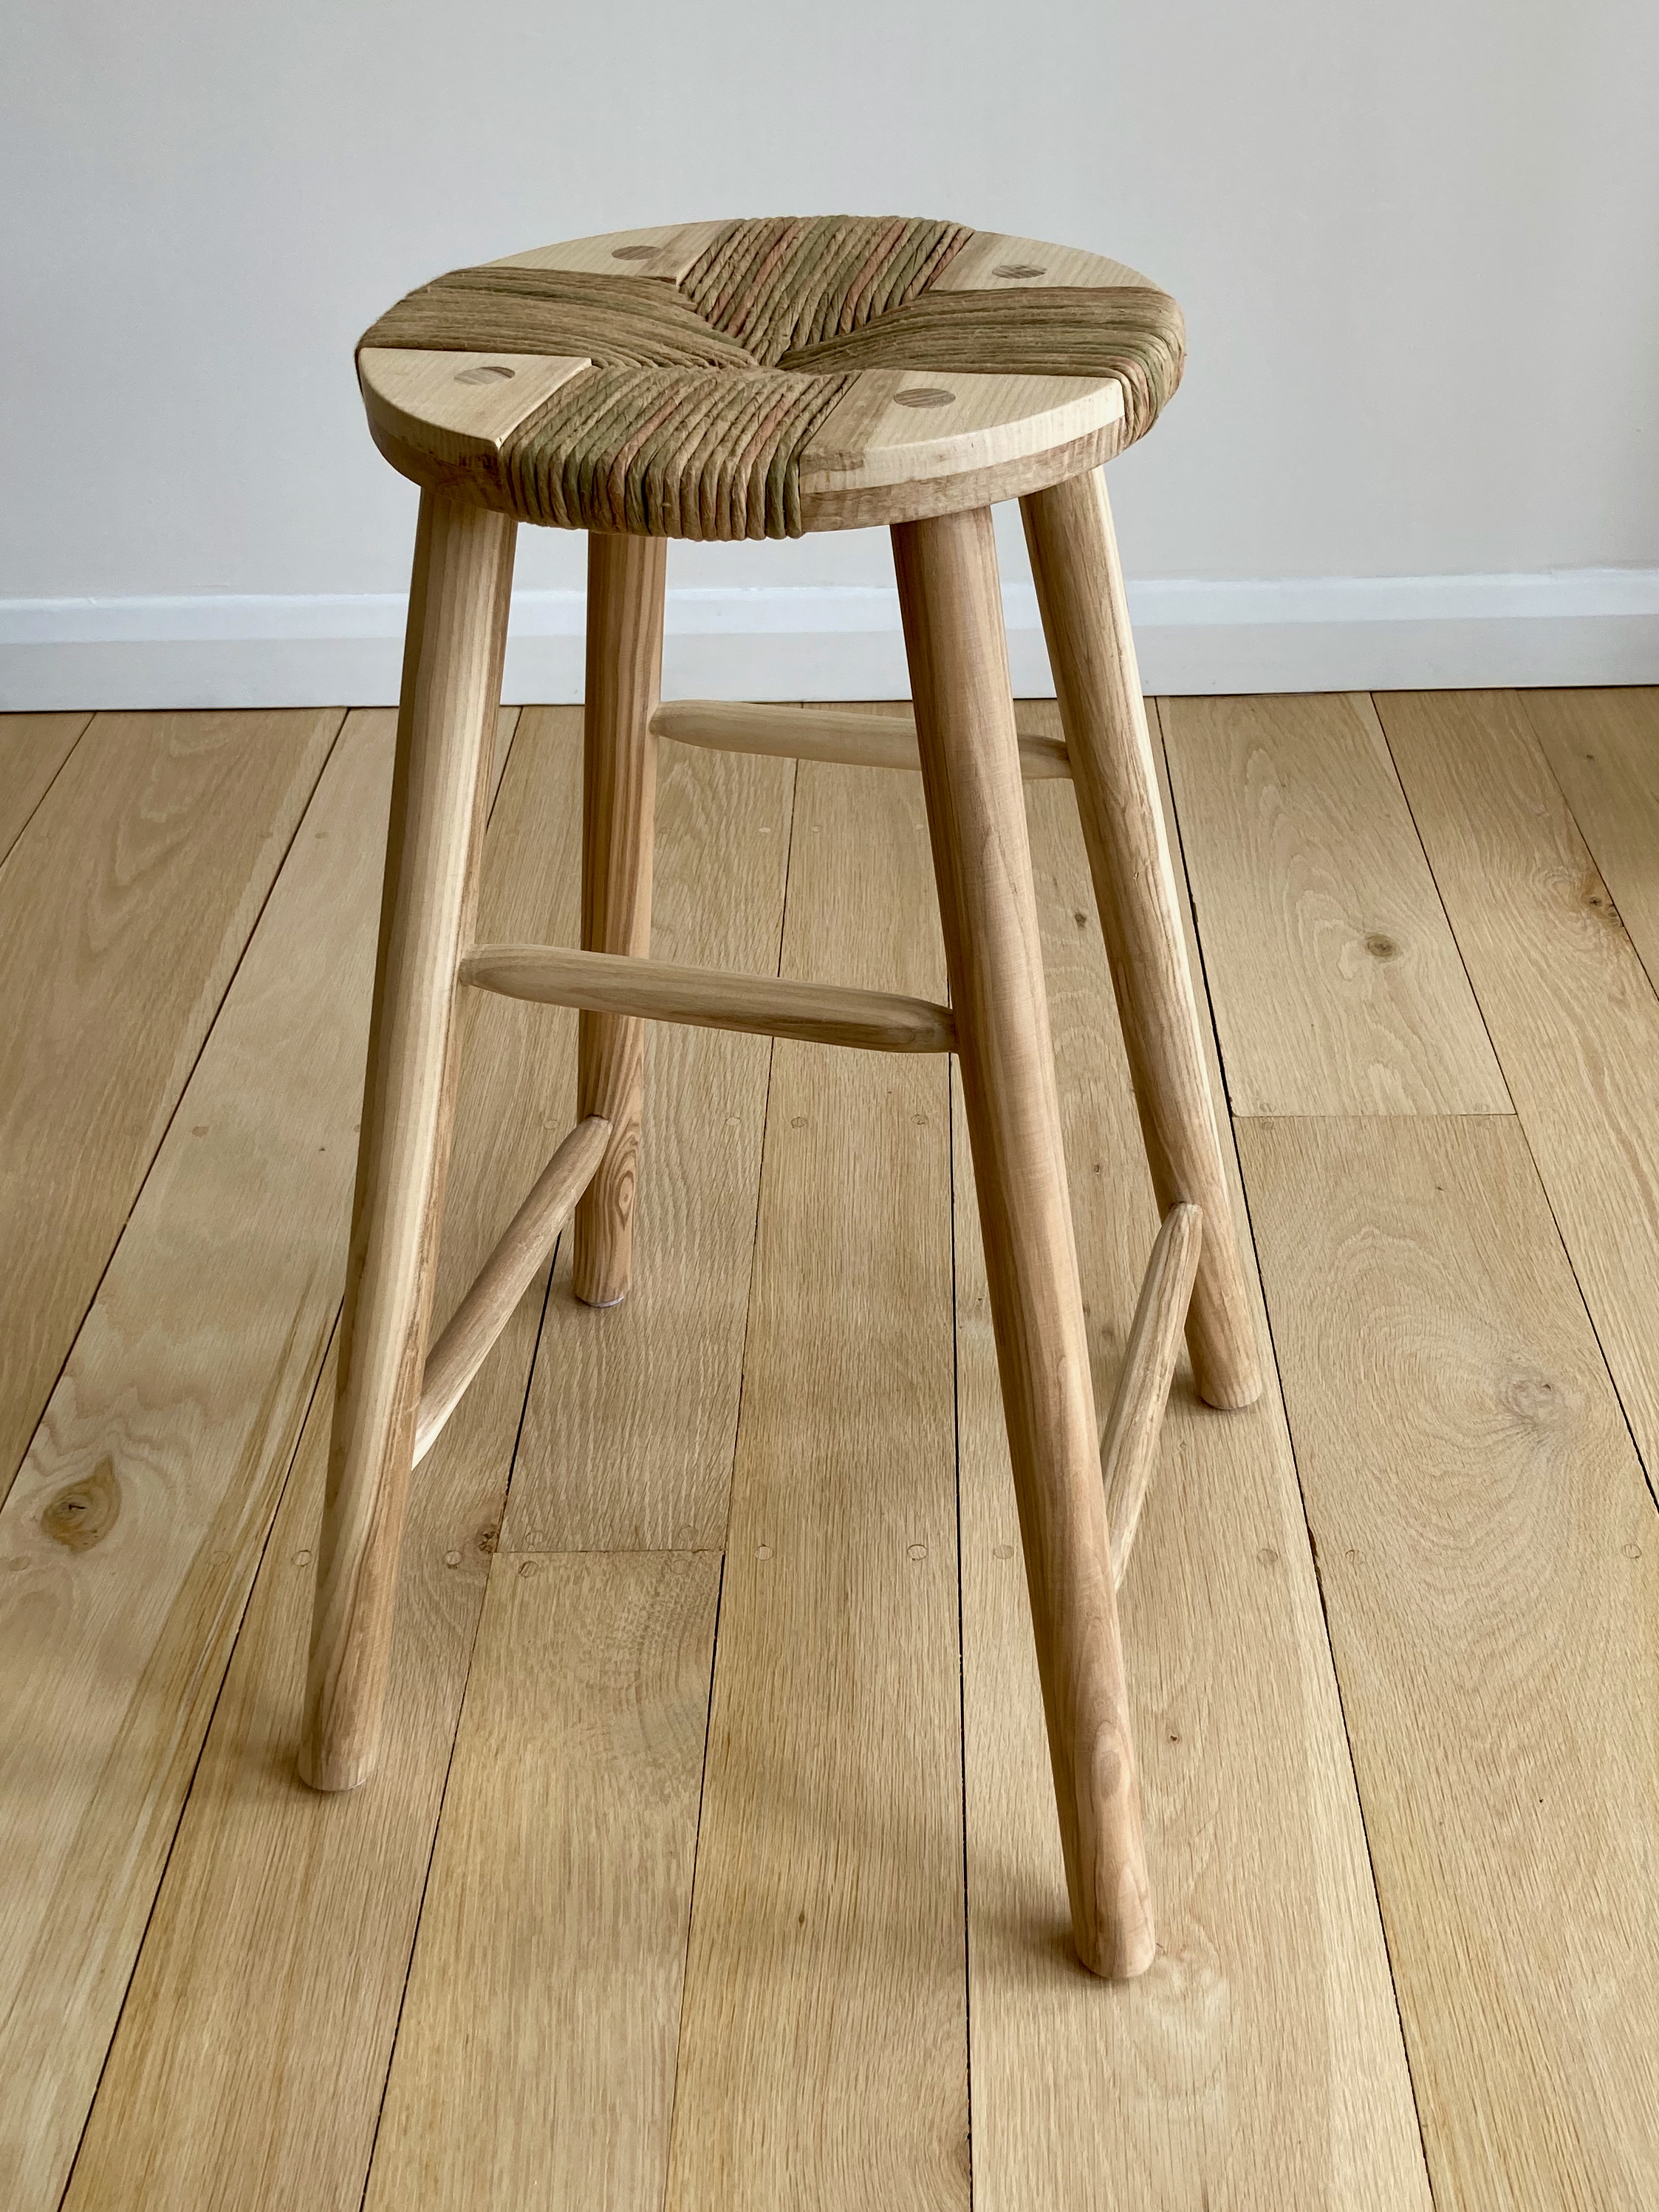
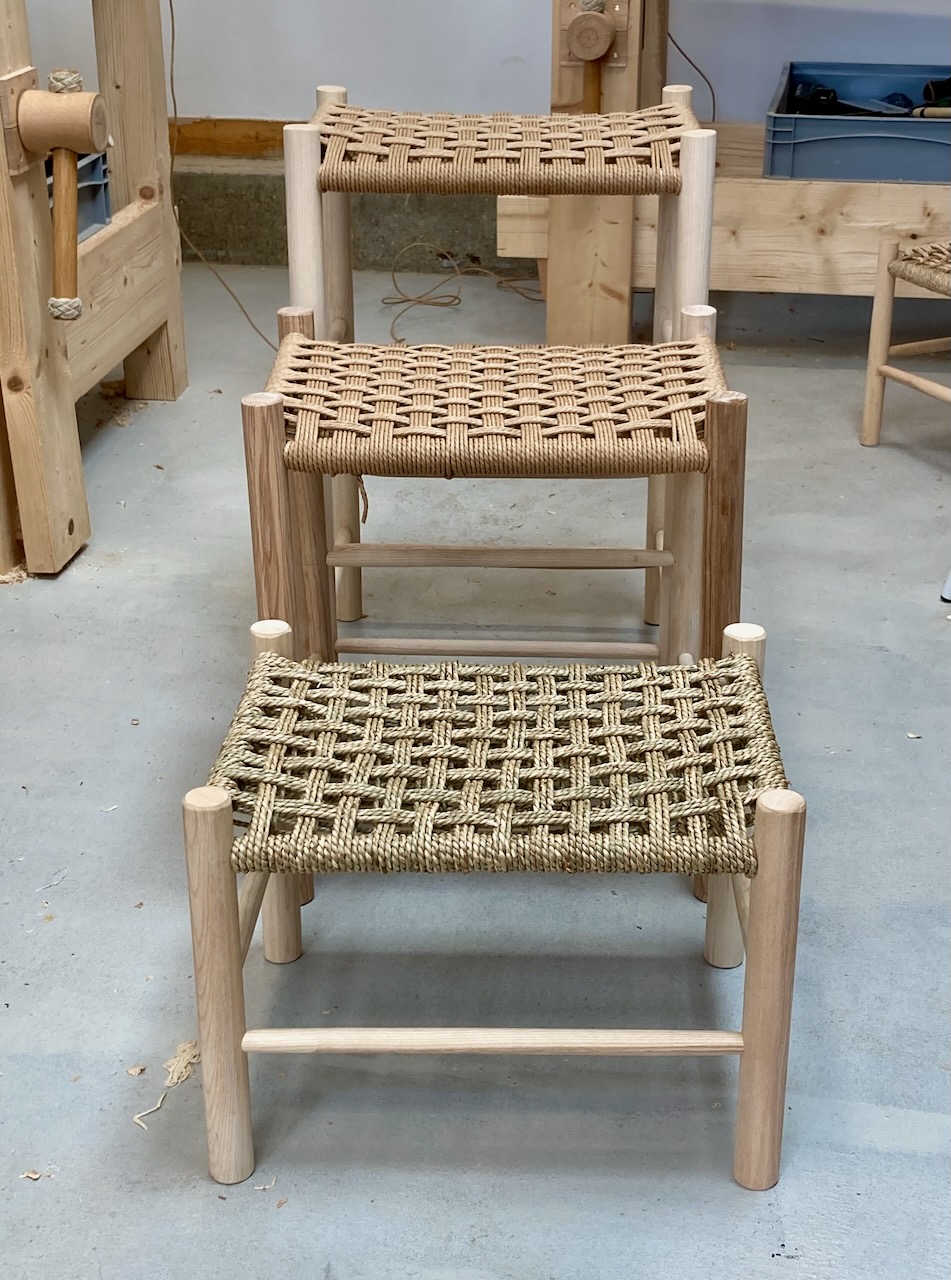
Stools
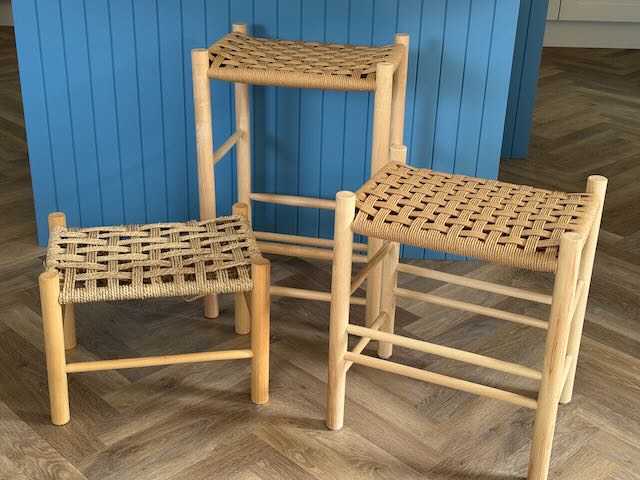
The simple stool courses are our most popular. This two day course started with the little one rung milking stool but more and more people are asking to build them bigger. When you book this course on craftcourses.com it will default to the smallest stool. If you want to build a stool that works well under a dining table or as a bedside table choose the option to add timber for a 50cm stool. If you want it to work well at a kitchen counter select the option to add timber for a 70cm stool. These are nominal heights for the leg blanks. The seats are actually at about 46 and 64cm respectively and have been designed around long-standing conventions that suit the majority of people and living spaces. But you can always make them shorter!
Adding rungs means a bit more work rounding legs, drilling mortises and cutting tenons so it’s a slightly longer first day but you get a beautiful piece of furniture that fits your home.
As always, if you’re interested in coming on a course and you want to find out more please give us a ring (07778 397328) or drop us an email. You can book all of our courses through the links on our website. If our dates aren’t perfect for you or you want to book for a group give us a call; we can usually work something out.
There was so much space before we put the benches in!
Come and visit our workshops in July!
We finished the expansion of the workshops over the winter and are now running all of our courses with six participants. If you don’t have the chance to come on a course why not visit us one weekend in July? This year we’re taking part in Cambridge Open Studios and invite you to come in and see what we’re doing. There might even be biscuits…
COS has been running for over 50 years and is an annual opportunity to meet artists and craftspeople in their studios. This will be our first year opening our doors for this event and we’re really looking forward to it.
There are several local artists in the Wilbrahams and Fulbourn who will also be taking part and they’re very much worth a visit so if you’re free for a weekend in July come and see us.
We’ll be open from 10-5 on both Saturday and Sunday of the 5/6th, 12/13th and 26/27th. We’re running a course on the 19th and 20th so we won’t be open for visitors then but look forward to seeing you on any other weekend in July.
We’ve had a couple of changes to our show calendar and are delighted to have been accepted to Living Crafts Festival at Hatfield House in Hertfordshire. If you haven’t been before it’s worth the trip; it’s one of the biggest and most diverse craft shows we’ve been to and has an unparalleled range of workshops and activities.
If you think there’s a craft show within an hour’s drive of Cambridge that we should attend please drop us a line. We’re always grateful for new opportunities.
Books
We often get asked for book recommendations. Whilst there are lots of books about building Windsor Chairs there are fewer that are great for ladder backs, post and rung and rush-seated chairs. The two I got started with are often available used and are both an excellent introduction to the craft. They’re by no means exhaustive though. When describing the process of building the legs of a chair one of the authors writes, “Turn or otherwise round the legs…” which leaves plenty to the imagination. A little face-to-face instructions won’t go amiss!
Jack Hill’s book is often very reasonably priced but copies of Langsner’s book are sometimes eye-wateringly expensive. Setting up a search on Abebooksco.uk is worth doing.
What’s for tea?
All of the food on our courses is hand-made by Bryony. She trained at Le Cordon Bleu as a patisserie chef so her standards are rather high!
As always, if you’re interested in coming on a course please give us a ring (07778 397328) or drop us an email. You can book all of our courses through the links on our website.
We’ve got two courses left this season; it draws to a close at the end of October. After that it gets a bit chilly in the workshop!
We’ve had a fantastic year so far: our first in our new workshops. Thank you so much to everyone who has attended. We’ve enjoyed every minute of it (except for that bit where StJohn cracked a tenon in a student’s stool! Don’t worry… all fixed.)
Last year our March and April courses booked up over Christmas but we had spaces later in the summer.
Shows next year
We’ve got one show left this year: the London International Woodworking Fair on the 1st and 2nd November. It’s going to be a good one; we hope to see you there.
We exhibit at craft and country shows about once a month during the Spring and Summer. It’s a lovely way of meeting potential new chairmakers! If you’d like to have a chat about our courses and see some of the chairs, stools and benches you can make come along to a show next year and we can meet.
We don’t have exact dates for next year’s shows yet but this is our rough plan:
If you think there’s a craft show within an hour’s drive of Cambridge that we should attend please drop us a line. We’re always grateful for new opportunities.
It’s a work in progress but it’s most of the way there. If you’ve been on a course with us and spot something that’s missing please let us know.
On which note…
Christmas List
It’s almost acceptable to talk about Christmas in October so we’re taking the opportunity to publish The Quiet Workshop Christmas List 2024. This might become an annual event! Five gifts for the chair maker in your life at a range of prices:
Under £10
Olfa Slimline knife. Our favourite marking knife for when a pencil isn’t precise enough. Also good for any number of other workshop tasks and as the blades are snap-off it doesn’t need sharpening.
£10 to £20
Folding rule with depth gauge. StJohn has been carrying one of these for years. It has survived the washing machine but we don’t recommend a fast spin cycle. Over the winter we’re replacing all of the tape measures in the workshop with these because they’re more accurate and easier to use.
Diamond sharpening stone. We sharpen with oil stones in the workshop but if we were starting from scratch we’d buy a double sided diamond stone and never have to flatten it.
Over £100
The Quiet Workshop Bench screw and nut: £150. We make these and you can order them directly from us. Everyone who takes a class at our workshop knows how quick these are to use and how tightly they hold. We have about ten left in stock but won’t be making any more until after Christmas. If you’re planning a workbench build this is a great place to start.
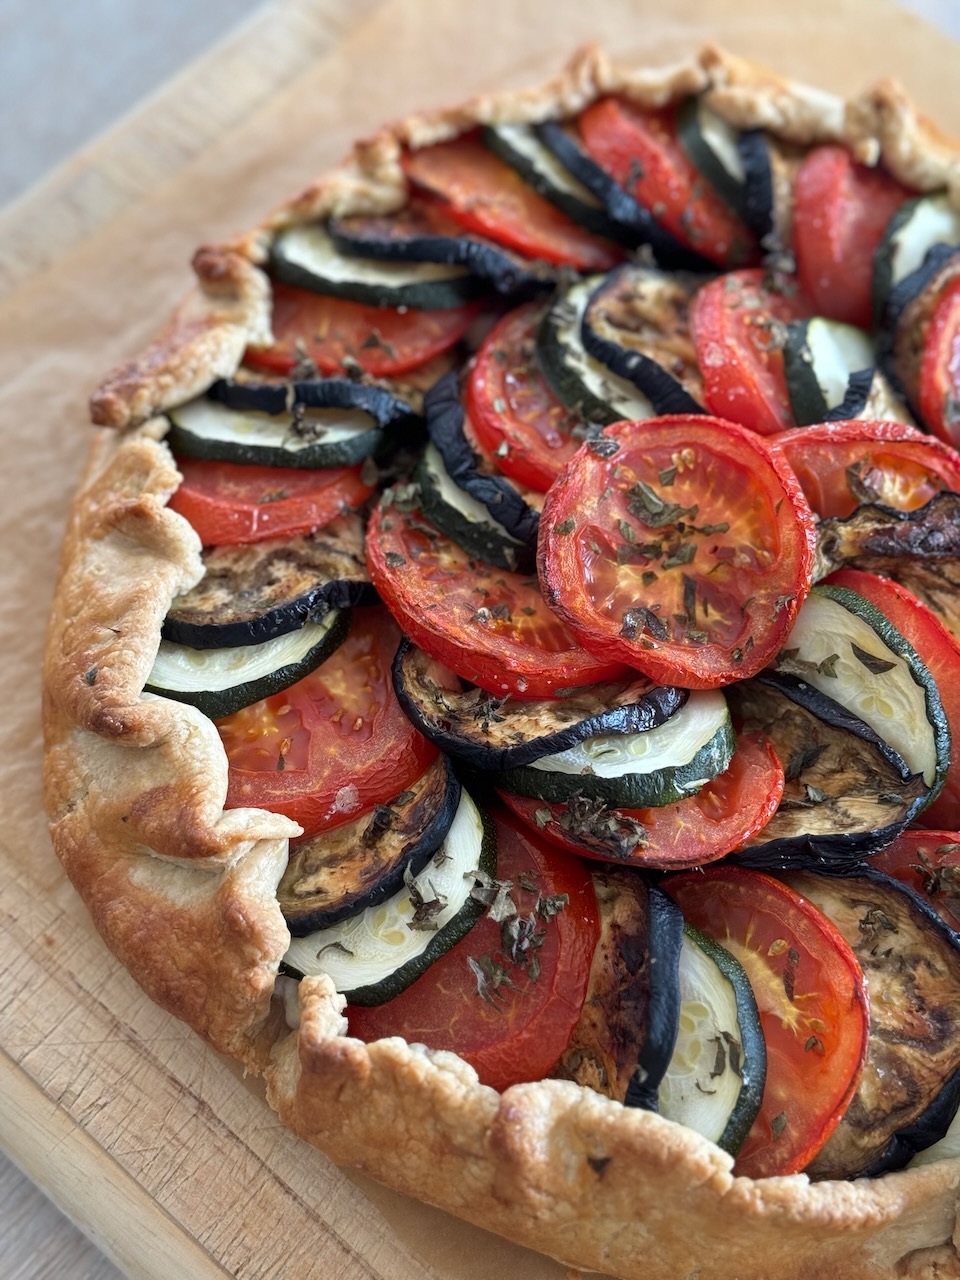
What’s for lunch?
Since this was so popular last time here are some pictures of Bryony’s gorgeous food!
As always, if you’re interested in coming on a course please give us a ring (07778 397328) or drop us an email. You can book all of our courses through craftcourses.com
Despite some miserable weather it’s been an absolutely lovely summer in the workshop. We’ve run almost a dozen courses already this year and met many wonderful chair makers. Thank you to everyone who has attended; it’s been an absolute pleasure.
Our stool making courses have been sold out so we’ve added some more later in the year. Chairmaking courses are more of a commitment but we’ve been really happy with the response and have seen some beautiful chairs leave the workshop, most built by absolute beginners.
Shows
We exhibit and demonstrate at craft and country shows during the summer. It’s a lovely way of meeting potential new chairmakers! If you’d like to have a chat about our courses and see some of the chairs, stools and benches you can make come along to a show and we can meet:
We look forward to seeing you there!
4th May 1pm-4pm Eadenstone Craft Fair, Cambridge – see you next year!
18th & 19th May Makers Central, NEC Birmingham – see you next year!
One of the most frequently asked questions on the course is about how we finish our furniture. Is it oil, lacquer, varnish? How do we apply it? Brush, roller, sponge, spray? How far do you sand? 240? 400? Higher?
The truth is: we hate sanding. And we’re not all that keen on smelly finishes and oil soaked rags. When we’re making a commissioned piece for sale we pull out all the stops but if we’re making a piece for us or a friend we have a very simple formula:
Sand with 80 grit
Burnish and wax
Polish
That’s it!
The key to this is a burnisher made from the offcuts of seagrass or Danish cord. These are based on the traditional French Polissoir which was just a bunch of straw wrapped up tightly with some more straw. We rub the burnisher in a hard wax that we make ourselves and then rub it hard on the sanded or planed timber. Rather than abrading the surface it burnishes it creating a smooth and silky surface. Then we just rub off any excess wax and call it done. It leaves a lovely smooth, soft sheen.
If it starts to look dirty or dull in a few years then we wash it with warm water and burnish it again.
Building a tall stool
We get a lot of requests to build a tall stool in the style of the simple stool. It’s a huge amount of work for a two day course so we’re offering an option to extend a two day course by one day (before the scheduled course weekend) to do all of the stock prep needed for a tall stall.
On craftcourses.com we’ve added these extension days as separate courses. You will need to book the extra day for the course you’re booking.
What’s for lunch?
Since this was so popular last time here are some pictures of Bryony’s gorgeous food!
As always, if you’re interested in coming on a course please give us a ring (07778 397328) or drop us an email. You can book all of our courses through craftcourses.com
In our recent newsletter we listed the Eadonstone Craft Fair on the 5th May. It is actually on the 4th May. Sorry for any confusion!
Thank you for a great start to the year
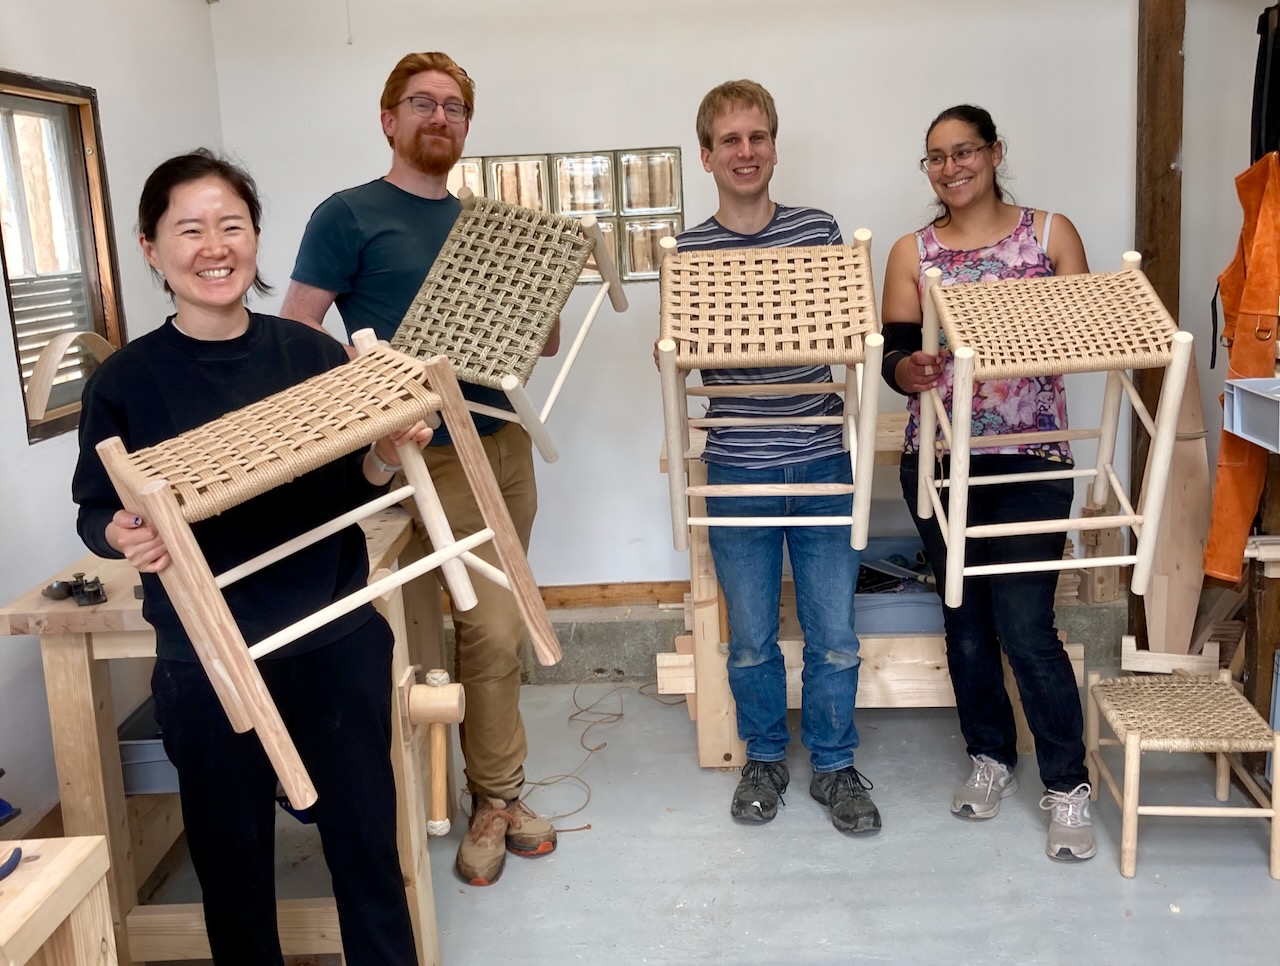
We’ve been incredibly busy here at The Quiet Workshop but all of that hard work is now being rewarded. We’ve run four workshops in three different designs at our new workshops so far this year and have lots of bookings going into the summer. Thank you for your support.
We had a lovely bunch of stool makers last weekend who all made beautiful pieces. It’s been a delightful start to the season and we’re really grateful for the reviews on craftcourses.com.
The new workbenches are in place and working well and the workshop looks lovely in the spring light. It’s a pleasure to be in there.
Several of our courses, particularly the round stool and simple stool have sold out so we’ve added a number of new dates, mostly at weekends. Have a look at craftcourses.com for the dates that suit you.
Shows
We exhibit and demonstrate at craft and country shows during the summer. It’s a lovely way of meeting potential new chairmakers! If you’d like to have a chat about our courses and see some of the chairs, stools and benches you can make come along to a show and we can meet:
We often get asked for tool lists. We try to keep the number of tools we use on courses as small and as affordable as possible so that when you go home and build your course chair a sibling it doesn’t cost you a fortune.
Some students want to bring their own tools. We’re very happy to accommodate that but we don’t have time to set them up and sharpen them during a course so only bring them if they’re in good condition. To give you an idea of the tools we use here is a photograph of the basic set for a simple stool or chair course. It doesn’t include all of the clamps and some of the less used tools.
If you want to bring some of your own tools but don’t know if they’re appropriate drop us an email and we can talk it through.
What’s for lunch?
The lovely reviews our students have posted seem to be as much about the food as the chairmaking!
When you come on a course you get elevenses, lunch and cake mid-afternoon. Bryony makes everything fresh each day and often the mid-morning cookies are still warm from the oven.
Last week we had our food hygiene inspection and all of the training, planning and preparation paid off with full marks!
As always, if you’re interested in coming on a course please give us a ring (07778 397328) or drop us an email.
“After a while you can get used to anything.” Albert Camus, The Stranger
I’m thinking of rickety workbenches, not being incarcerated in an Algerian prison for murder, but you take the point: I have a high tolerance for ropey workbenches.
But I’ve finally been jolted into building a better bench. I’d like to extend the Camus analogy by making a parallel between my passive acceptance of the wobblyness of my bench and Meursault’s sleep-walk towards his own execution but that would require me to draw a link between him waking from his ennui by shouting at a priest delivering his last rights and my own renaissance. My shame was far more twenty-first century: flamed on YouTube for a shaky bench. Twice. It’s amazing what people can get cross about.
So before I launch into this timber framing project let’s take a look at what led up to it. It started here:
Dad likes Workmates so much that he owns two. And modifies them. He had a blue one when we were kids. I wonder what happened to it. We did a lot of work on that bench.
This isn’t the one we used. It didn’t survive the abuse.
Despite the Workmate a lot of my early woodworking was done on a picnic table. They make surprisingly good workbenches. The seats are at the perfect height for breaking down stock with a hand saw and the table-top has gaps between every slat. On some tables these are big enough for clamp. If you’re careful you can line the gaps up with the circular saw kerf. If you’re not you learn how to repair picnic tables.
Short of a decent vice what’s not to like? Some are a bit wobbly and perhaps that’s where my existential malaise started.
At school, like every child of my generation, I used the standard British joiners’ bench. One vice, a tool well and a brush. Sweeping up was as much a part of woodwork classes as learning to saw straight. It was here that I learnt to love tool wells. And sweeping.
Camus notwithstanding I never got used to the Japanese saw (it doesn’t help that it doesn’t match the bench hook) and my tolerance for these two terrible squares didn’t last longer than this project.
As an adult with limited storage space I went back to the Workmate but as projects got bigger space remained tight and I built a sawhorse workbench: two strips of plywood bolted to sawhorses with insert nuts in the tops. This was surprisingly robust; it barely moved. I put this down to the number of legs. But it still didn’t have a vice or any decent workholding other than clamps. So I built a ‘lightweight’ folding bench. Originally it had a crochet and no vice. (There are proponents of viceless woodworking out there: people who encourage beginners to take up a craft with one hand tied behind their backs. I have bad words for them.) So after a few years I installed a massive Record 53 on the front of my lightweight bench. This led to the hole in the workshop floor and the floorboard repair I did last year.
Matriphagy is not uncommon with workbenches.
During my last project I spent quite a bit of time thinking about how I used the bench and what I wanted to keep and change.
Staying
Tool tray
I like my tools on the bench, not the floor. Wells and trays fill up with shavings, reduce the usable space on your bench and allow bad habits to form but I don’t care. I like them and I’m sticking with them.
Holdfasts and holes
All holes will be round, or more accurately, cylindrical. With astonishing timing Simon James decided to start making 1″ holdfasts at a sensible price when I bought the timber for the bench. I’ve been using the late Richard Tomes’ 3/4″ holdfasts for several years and if Simon James’ version are as good I’ll be delighted. They are absolutely massive and won’t need much of a tap to set them solidly.
Tail vice
I use a Veritas inset vice and bench dogs. It’s slow but excellent value and with a clever two position dog. I’m sure a batten and toothed stop work but one can grow used to luxury as well as privation and my next end vice will bigger and better.
Portable
More on this later.
Going
Never been used
Apron
I only use one of the holes on the apron a lot and it will be in the leg of my next bench. The others are largely redundant. I used them more before I installed the vice.
The old bench is starting to feel a bit emasculated
Lightweight
Colin Chapman said “Simplify, then add lightness.” But he was building things to move – quickly. Two inches of ash aren’t enough to stop a bench roaming around the workshop. The legs will be four times the cross sectional area and the top twice as thick.
Folding
I’ve been procrastinating about this for years. I wanted something very heavy but portable. Hard to achieve.
I do occasional demonstrations but most of my itinerant woodwork has been done at the boatyard. For several years I thought I’d build a massive French bench with wheels and floor locks. Then I realised that although I could get it out of the workshop, across the garden and through the kitchen it would never turn the corner in the hallway of our Victorian terrace (row house).
Then Will Myers published a terrific account of building his Moravian workbench. It’s been on my list for a while and I’ve finally got a gap between projects. It has everything I want: weight, portability, a tool tray and great workholding.
Will built his from white pine. I’m making my life more difficult (and expensive) by using oak. But it adds weight and weight is good.
I have an idea for a pair of wheels that fit on an axle that passes through a dog hole. This should make the four inch laminated top a bit more mobile.
I’ve glued up one set of legs. Eventually it will have two sets: high and low, carving and joinery. Don’t hold your breath; it’s a big project. But waiting is something you can get used to.
We noticed you're visiting from United States (US). We've updated our prices to United States (US) dollar for your shopping convenience. Use Pound sterling instead.Dismiss